
Edit
Scenario Creator: Complete Guide
This guide is a work in progress: new sections are added regularly.
The Scenario Creator lets you build your own interactive scenarios inside Lucid Lust, from a short visual novel to a full movie, a branching story, or even a mini-game. You place characters, objects, lights, and effects in 3D environments, then chain Steps in a node graph to decide what the player sees, hears, and can do, and in which order.
Everything you import (music, voices, images, videos, and sounds) is packed into a single .scenario file, which will be played the same on every supported platform (Windows, macOS, and Linux).
This tutorial will guide you step by step through every menu, panel, and Step type of the Scenario Creator.
Quick Navigation
- Overview
- 1. Opening the Scenario Creator
- 2. Global Interface
- 3. Settings Menu
- 3.1 Close
- 3.2 Global Help
- 3.3 Auto-Save Settings
- 3.4 Save, Keybinding and Quit
- 3.5 Step Switch Camera
- 3.6 Scenario Title and Description
- 3.7 Thumbnail
- 3.8 Scenario Signature
- 4. Keybinding Menu
- 5. Timeline Node Graph
- 5.1 Switch to the Entity Spawn Browser
- 5.2 Bottom Panel Toggle
- 5.3 Test Buttons
- 5.4 Tools & Libraries
- 5.5 Graph Toolbar
- 5.6 Start Node
- 5.7 Step Nodes
- 5.8 Node Parameters
- 5.9 Organizing the Graph
- 6. Entity Spawn Browser
- 6.1 Switch to the Timeline Node Graph
- 6.2 Category Tabs
- 6.3 Thumbnail Size
- 6.4 Search and Filters
- 6.5 Entity Grid
- 7. Moving Entities
- Steps
- 8. Steps: the Basics
- 9. View Step
- 10. Dialogue Step
- 11. Choice Step
- 12. Title Step
- 13. Focus Step
- 14. Gesture Step
- 15. Input Step
- Libraries
- Scene
- 18. Sun & Sky Editor
- 19. Player Camera
- 20. Characters
- 21. Animation & Pose
- 22. Attaching Entities
- 24. Lights
- Flow Nodes
1. Opening the Scenario Creator
The Scenario Creator is opened from the main menu of the game.
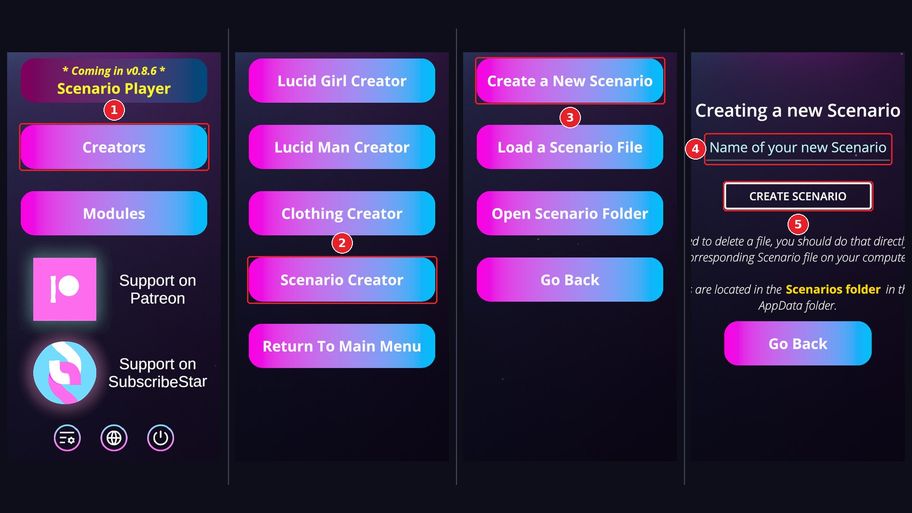
① On the main menu, click Creators.
② Click Scenario Creator.
③ Click Create a New Scenario. In the same menu, Load a Scenario File opens a scenario file, and Open Scenario Folder opens the folder where scenarios are stored.
④ Type the name of your new scenario. It becomes the title of the scenario.
⑤ Click Create Scenario: the Scenario Creator opens on an empty scene.
Loading a scenario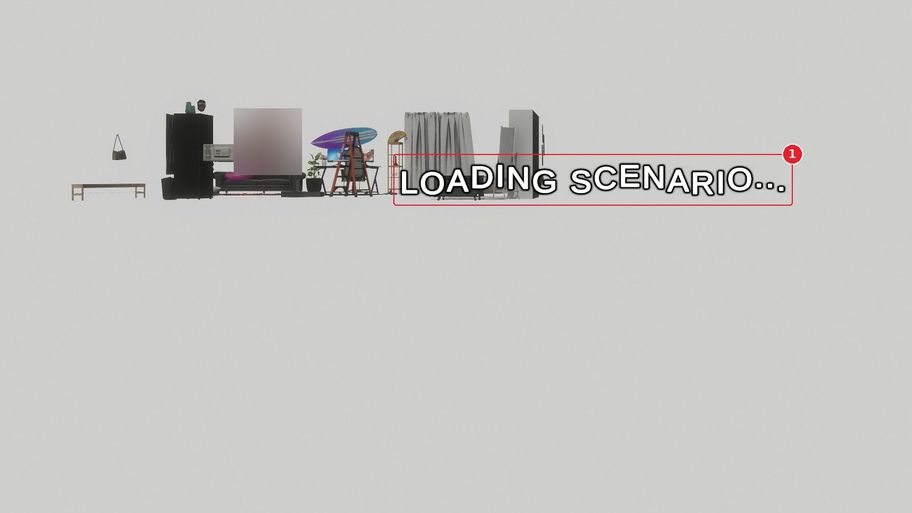
① When you open a scenario with Load a Scenario File, Loading Scenario... is shown while it loads, then one line per character (Loading character 1/2: ...). Wait until the message disappears before you start working.
If the auto-save of this scenario is more recent than your last save, the auto-save is the one that opens (see 3.3).
Scenarios are stored in the Scenarios folder, inside the persistent data folder of the game. To delete a scenario, delete its file directly in this folder, together with its _autosave file if there is one.
The Scenario Player, which will let you play scenarios without having to go through the editor, is coming in v0.8.6.
2. Global Interface
The following screenshot shows what you see when you open the Scenario Creator for the first time: an empty scene and three buttons.
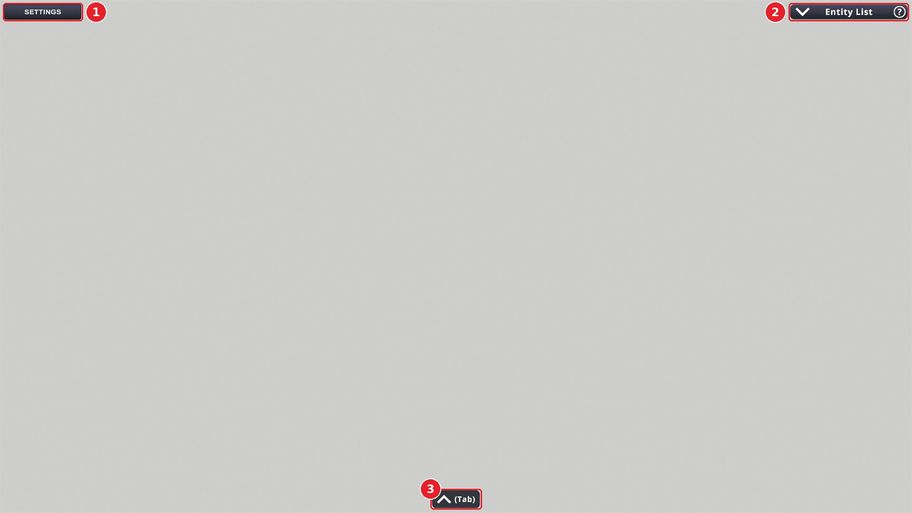
The scene itself fills the whole screen. Every panel described below can be opened and closed, so you can always get a clear view of your work.
Below is a detailed explanation of each numbered annotation.
① Settings
Opens the Settings Menu, with the keyboard shortcuts, the save options, and the details of your scenario.
② Entity List
Opens the list of every entity in the current environment. See Entity List below.
③ Bottom Panel
Opens and closes the Bottom Panel, which holds the two main tools of the Scenario Creator: the Timeline Node Graph and the Entity Spawn Browser. The Tab key does the same. Close the Bottom Panel when you want to see the whole scene.
The Entity List
The Entity List lets you find and select any entity of the current environment in a click, even when it is hidden behind something else or very small.
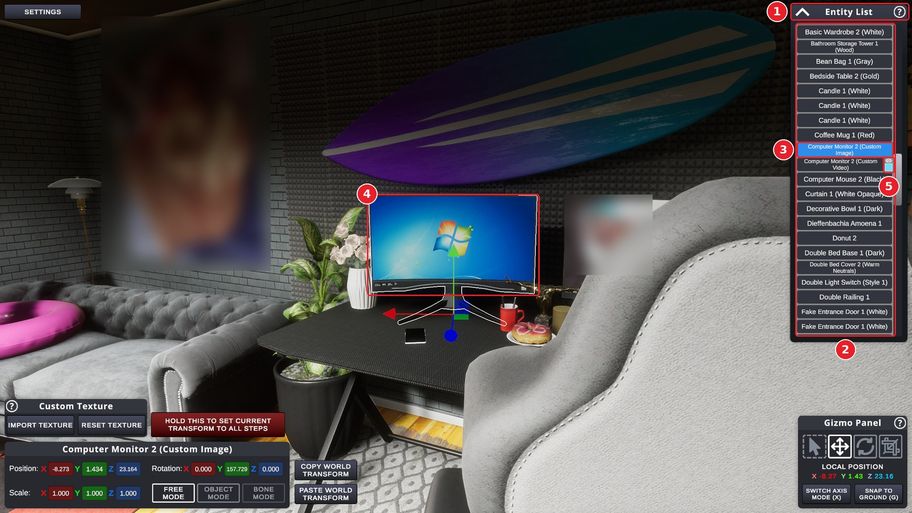
① Click Entity List to open or close the list.
② The list shows every entity placed in the current environment.
③ Click an entity in the list to select it.
④ The entity is selected in the scene, and the scene camera targets it.
⑤ Characters, animated entities, looping FX, decals, and screens playing a video have an eye toggle on their row: untick it to hide the entity in the current Step. A Step duplicated from this one starts with the entity hidden too.
Tip: hide the characters that are not used in the current Step, to keep the scene light.
3. Settings Menu
The Settings Menu gathers the help, the save options, and everything that describes your scenario.
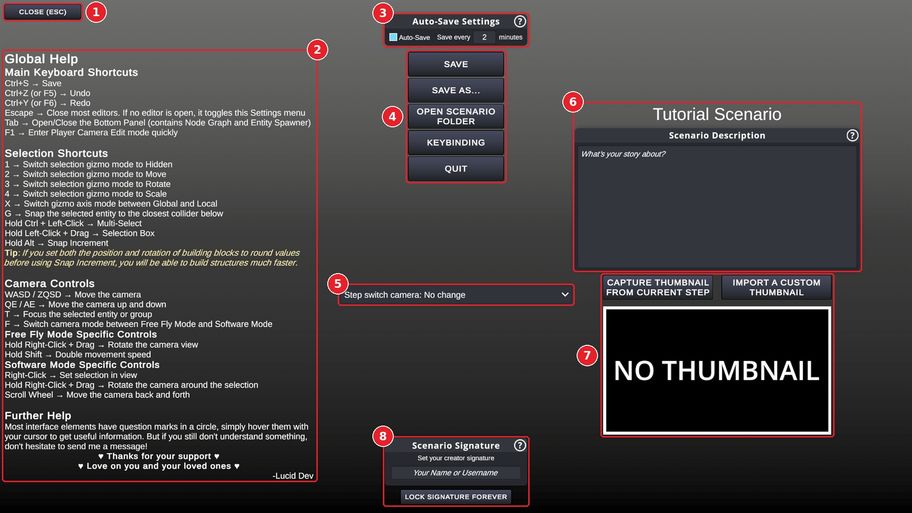
① Close
Closes the Settings Menu and brings you back to the scene. The Escape key works too.
② Global Help
A reminder of every keyboard shortcut, always one click away.
A. Main shortcuts
- Ctrl+S to save, Ctrl+Z (or F5) to undo, Ctrl+Y (or F6) to redo.
- Escape closes most editors and libraries. When nothing else is open, it deselects the selected entity.
- Tab opens or closes the Bottom Panel.
- F1 enters the Player Camera edit mode quickly.
- Page Up and Page Down go to the previous or the next Step, in the order the Steps were created. Ctrl+Insert duplicates the current Step.
B. Selection shortcuts
- 1, 2, 3 and 4 switch the gizmo of the selected entity between Hidden, Move, Rotate and Scale.
- X switches the gizmo axes between Global and Local.
- G snaps the selected entity onto the closest collider below it (Snap to Ground).
- Hold Ctrl and left-click to add or remove entities from the selection, or hold the left button and drag on an empty area to draw a selection box. Shift+click removes an entity from the selection.
- Hold the left Alt key while dragging the gizmo to move by steps of 0.1 m, rotate by steps of 15°, or scale by steps of 0.1.
- A click goes through environment walls: if an entity stands behind a wall, clicking the wall selects it.
Tip: if you set the position and rotation of building blocks to round values before using the snap increment, you will build structures much faster.
C. Camera controls
- WASD (ZQSD on AZERTY keyboards) moves the camera, and Q/E (A/E) moves it up and down.
- T focuses the camera on the selected entity or group.
- F switches between the two camera modes:
- Free Fly Mode: hold the right button and drag to look around. Hold Shift to move much faster.
- Software Mode: right-click puts the selection in view; hold the right button and drag to orbit around the selection, hold the middle button and drag to pan, and use the scroll wheel to move the camera back and forth (Shift + wheel moves faster).
- Hold Ctrl to freeze the camera.
D. Further help
Most elements of the interface have a tooltip (a question mark in a circle): hover it with your cursor to read a short explanation.
③ Auto-Save Settings
Tick Auto-Save to save your scenario automatically, and set how often it is saved, from 1 to 60 minutes (2 by default). The auto-save goes to a separate file, ScenarioName_autosave.scenario, and never overwrites your own save. The autosave file is also written when you close the game.
When you open a scenario whose auto-save is more recent than your last save, the auto-save is the one that opens.
④ Save, Keybinding and Quit
- Save saves the current scenario (Ctrl+S).
- Save As... saves the scenario under a new name, which also becomes its title, and you keep working in this new file.
- Open Scenario Folder opens the folder where your scenarios are stored.
- Keybinding opens the Keybinding Menu.
- Quit goes back to the main menu.
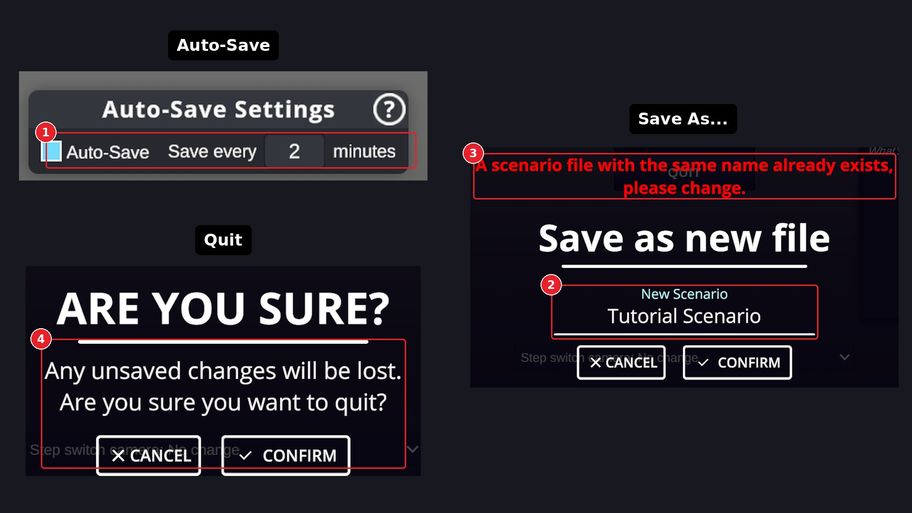
① Auto-Save ticked: here, the scenario is saved every 2 minutes.
② Save As... asks for the new name of the scenario. Type it, then click Confirm.
③ The name must be free: if a scenario file already has it, a red message asks you to change it. A name also cannot be empty, contain a character that is forbidden in file names (such as / \ : * ? " < > |), or end with _autosave.
④ Quit asks for a confirmation, because every unsaved change will be lost.
⑤ Step Switch Camera
Chooses what the editor camera does when you select another Step in the Node Graph:
- No change: the scene camera stays where it is. This is the default.
- Match player camera on environment change: the scene camera jumps to the Player Camera of the Step only when that Step takes place in another environment.
- Match player camera every step: the scene camera jumps to the Player Camera of every Step you select.
This is a personal preference: it is not saved in the scenario, and it stays the same across scenarios.
⑥ Scenario Title and Description
The title at the top is the name you gave to the scenario when you created it.
Below it, write a short description of your story in the Scenario Description field.
⑦ Thumbnail
The thumbnail is the picture that represents your scenario.
- Capture Thumbnail From Current Step takes the picture from the current Step.
- Import a Custom Thumbnail uses an image of your own instead.
The frame below the buttons shows the current thumbnail.
⑧ Scenario Signature
Signs the scenario with your creator name. A locked signature can never be changed, so read the next part before you lock it.
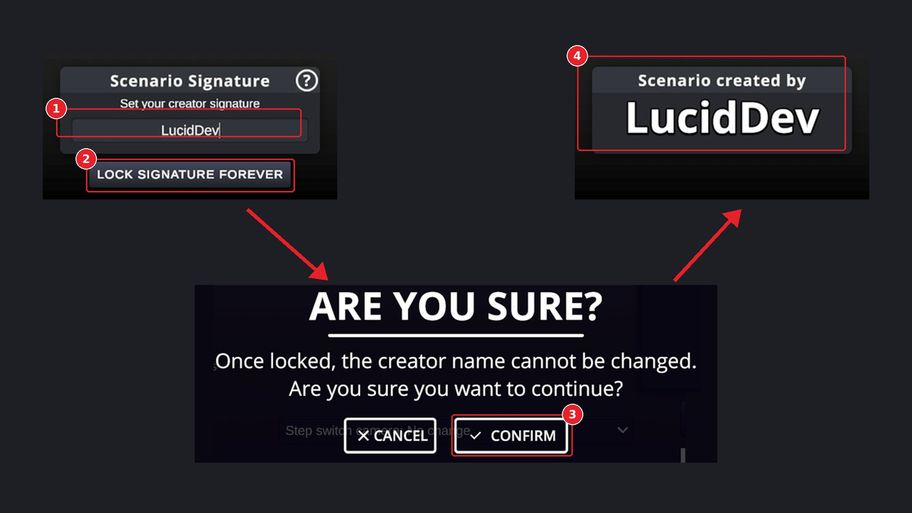
Locking your signature
① Type your name or username in the Scenario Signature field.
② Click Lock Signature Forever.
③ A confirmation appears, because a locked creator name cannot be changed. Click Confirm to lock it, or Cancel to go back.
④ The signature box now shows Scenario created by followed by your name. The signature is written into the scenario for good.
4. Keybinding Menu
The Keybinding Menu, opened from the Settings Menu, lets you change the keyboard shortcuts of the Scenario Creator.
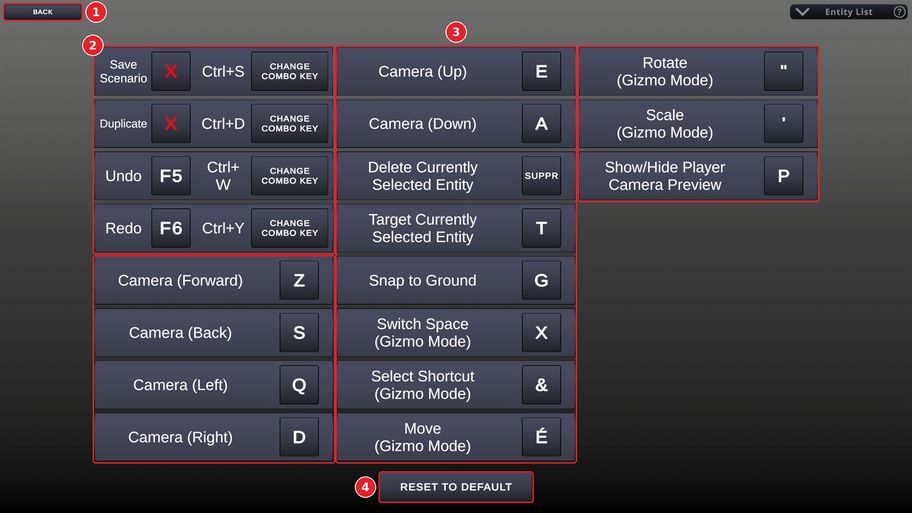
① Back
Returns to the Settings Menu. The Escape key works too.
② Shortcuts with Two Slots
Save Scenario, Duplicate, Undo and Redo can be triggered in two ways:
A. A single key, such as F5 for Undo. A red cross means that no single key is assigned.
B. A combination of Ctrl (Cmd on macOS) and a key. Click Change Combo Key to choose another key.
③ Single-Key Shortcuts
All other shortcuts use a single key: camera movement, deleting, targeting and snapping the selected entity, the gizmo modes and axis space, and showing or hiding the Player Camera preview. Click a key, then press the new key. Press Escape to cancel.
Keys are shown as they are printed on your own keyboard. On an AZERTY keyboard, for example, the camera moves with Z, Q, S, and D, and the gizmo modes use the &, é, ", and ' keys (so 1, 2, 3, and 4 on an AZERTY keyboard).
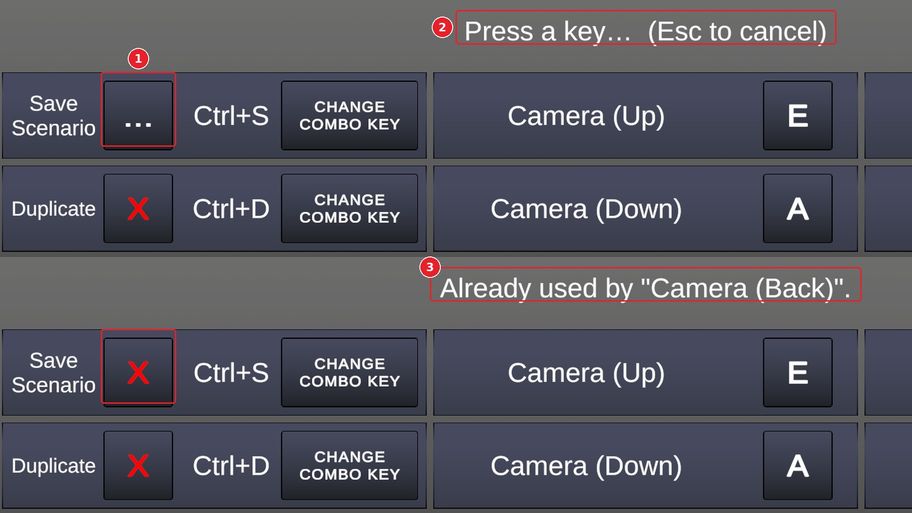
① Click the key to change: it shows ... while it waits for your input.
② The top of the menu says Press a key... (Esc to cancel). Press the new key, or Escape to keep the old one.
③ A key that another shortcut already uses is refused: the message names that shortcut, and the old key stays. Free the key first by giving the other shortcut a new key.
④ Reset to Default
Brings back every default shortcut.
5. Timeline Node Graph
The Timeline Node Graph is the heart of your scenario. Each node is a Step Node or a Flow Node, and the links between them decide the order in which the player moves through the story.
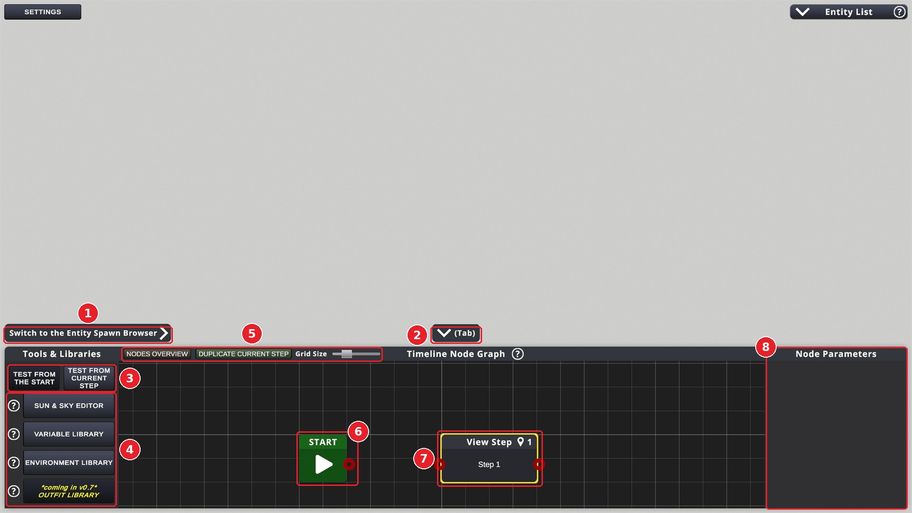
① Switch to the Entity Spawn Browser
Switch from the Timeline Node Graph panel to the Entity Spawn Browser panel.
② Bottom Panel Toggle
Closes the Bottom Panel. The Tab key opens and closes it.
③ Test Buttons
Play your scenario as the player will see it:
- Test From The Start plays the scenario from the Start node.
- Test From Current Step plays it from the selected Step, so you can check a scene without replaying everything before it.
A test is the real game: the editor disappears, and the camera, the dialogues, the choices, and every node (Steps and Flows) work exactly as they will for the player. Press Escape to stop the test and go back to the editor. The test also ends by itself when the flow reaches an output linked to nothing.
④ Tools & Libraries
- Sun & Sky Editor sets the sun, the sky and the clouds. See 18. Sun & Sky Editor.
- Variable Library sets the variables of your scenario. See 16. Variable Library.
- Environment Library sets the environments of your scenario. See 17. Environment Library.
- Outfit Library is coming in v0.7 (along with the Outfit instantiation).
⑤ Graph Toolbar
- Nodes Overview zooms the graph out to show every node at once.
- Duplicate Current Step creates a copy of the Step currently being edited.
- Grid Size shows a grid behind the nodes. Slide it all the way to the left to place nodes freely, or choose one of the four grid sizes, from large to very fine: nodes then snap to the grid when you move them. The grid size is a personal preference and doesn't affect scenarios.
⑥ Start Node
Every scenario begins at the Start node. Link its output to the first Step of your story.
⑦ Step Nodes
Step nodes are blue. Each one shows its type in its header, followed by a pin icon and the environment ID (its number) where the Step takes place. Its body sums up its settings, such as the speaker of a dialogue.
The circles are the connection points: the input is on the left, the outputs are on the right. They are red while they are free, and blue once they are linked. To link two nodes, drag from an output to the input of the next node (dragging an input to an output works as well).
Creating nodes
- A new Step node is made by duplicating an existing one with either Duplicate Current Step (to duplicate the currently being edited step) or by selecting any Step node and pressing Ctrl+D.
- Once duplicated, the new Step node starts as a copy of that Step.
- Flow nodes (purple) and sticky notes (yellow) are added with a right-click on the graph: a contextual menu opens, where you choose the type of node to add. See 23. Flow Nodes.
- Every node can be duplicated by pressing Ctrl+D, not only Step nodes.
Editing the graph
- Pan with the right or middle mouse button, and zoom with the wheel.
- Drag on an empty area to select several nodes, rename a Step or remove a link: see the pictures below.
- Delete removes the selected nodes. The Start node and the last Step of an environment cannot be deleted.
Careful: deleting nodes or links, and changing the type of a Step, cannot be undone (for now). Changing the type of a Step also erases its settings.
Linking rules
- The Start node and the Blend, Transition, and Environment nodes can only be linked to a Step.
- A Step can only lead to Steps of the same environment. To go to another environment, go through an Environment node.
- An output that is linked to nothing ends the scenario.
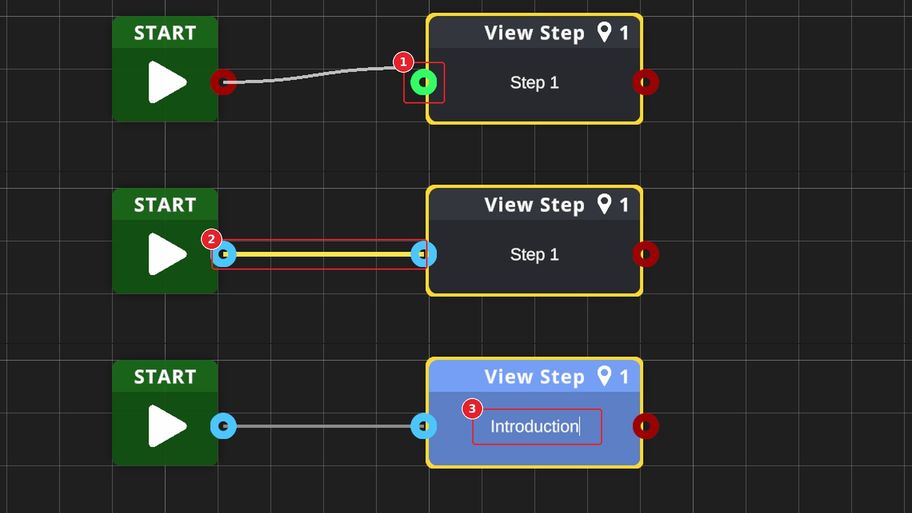
① Drag from an output to an input, or from an input to an output. The connection point under your cursor lights up green when the link is allowed. An output holds one link: a new link replaces the old one. An input can receive as many links as you want.
② To remove a link, hover it: it turns yellow and thick. Then right-click it.
③ Click the name of a Step node to type a new one. A Step cannot have an empty name.
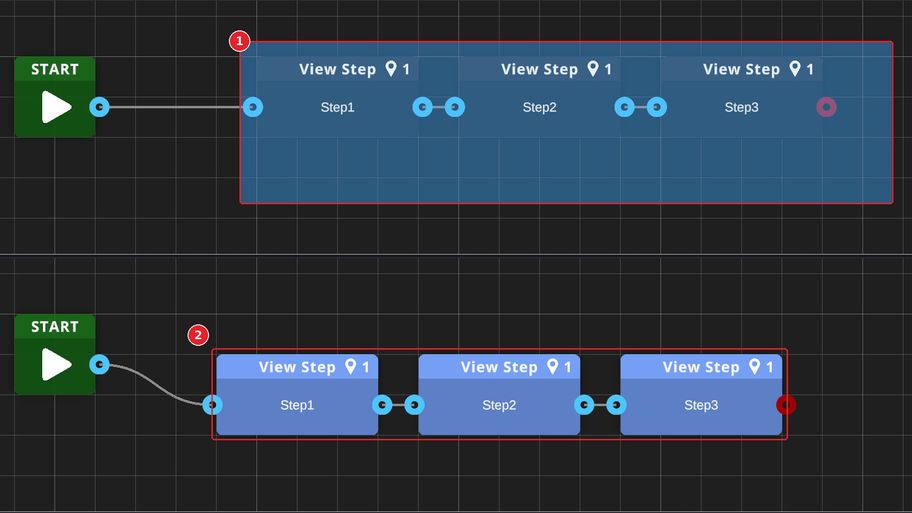
① Hold the left button and drag on an empty part of the graph: the nodes inside the blue rectangle are selected. Hold Ctrl while you drag to add them to the current selection, and Ctrl+click a node to add or remove it from the selection.
② Drag one of the selected nodes to move them all together. Click an empty part of the graph to clear the selection.
⑧ Node Parameters
Shows the settings of the selected node. Its content depends on the type of node: every Step type is detailed in the Steps sections below.
Organizing the Graph
Big scenarios can hold thousands of nodes. Two tools help you keep them readable, without changing how the scenario plays:
- Color zones: colored rectangles with a title, to group the nodes of a chapter or a scene.
- Sticky notes: add a yellow note from the right-click menu of the graph, type anything in it, and resize it as you like.
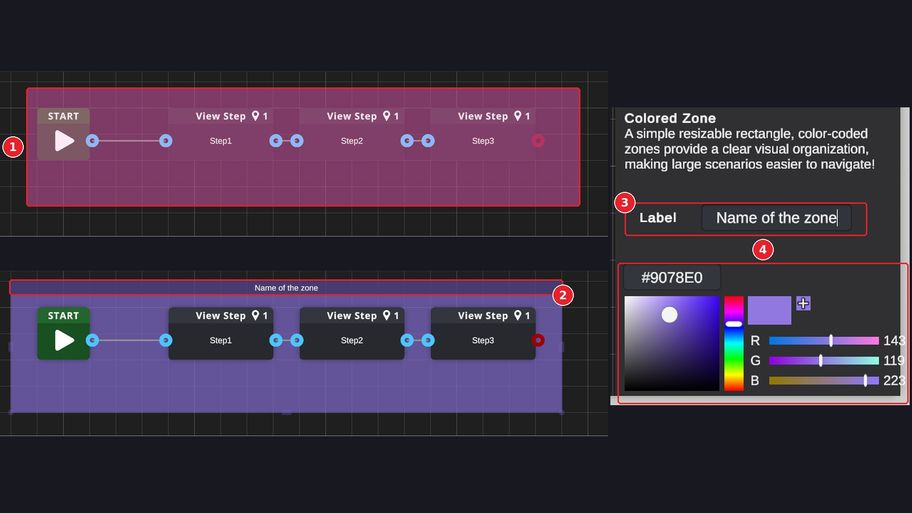
① Hold Shift and drag with the left button on an empty part of the graph to draw a zone.
② Click the top bar of a zone to select it, and drag the bar to move the zone. Moving a zone does not move the nodes inside it. Drag its left, right, or bottom edge to resize it.
③ Label: the title shown in the top bar of the zone.
④ The color of the zone: type a hexadecimal code, or use the color square, the hue bar and the RGB sliders.
Press Delete to remove the selected zone.
6. Entity Spawn Browser
The Entity Spawn Browser contains everything you can add to your scenes.
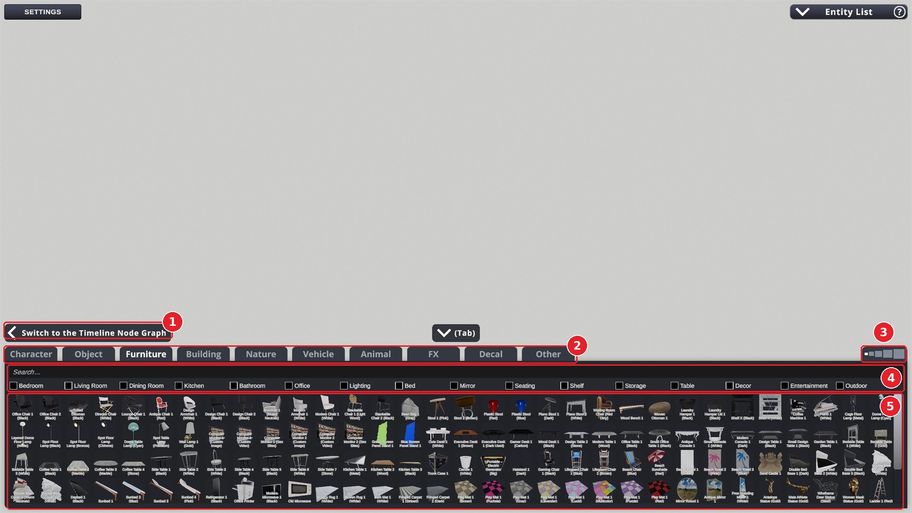
① Switch to the Timeline Node Graph
Brings the Node Graph back in the Bottom Panel.
② Category Tabs
Entities are sorted into ten categories:
- Character: the characters of your scenario. See 20. Characters.
- Object: props and small items.
- Furniture: everything that furnishes a room, from chairs and beds to lamps and mirrors.
- Building: walls, floors, doors, windows, stairs and other building blocks.
- Nature: trees, plants, rocks, water and other natural elements.
- Vehicle: from bikes to spaceships.
- Animal: animals, such as fish.
- FX: visual effects (VFX) and sound effects (SFX), played once or in a loop.
- Decal: graffiti, stickers, stains, and other details applied on surfaces.
- Other: every entity that doesn't fit into the other categories (lights, invisible/empty objects, floating UI elements, etc.).
③ Thumbnail Size
Changes the size of the thumbnails: each click moves to the next size. Click until the thumbnails have the size you want.
④ Search and Filters
Type a word in the search bar to find an entity quickly: it finds the entities whose name or tags contain this word. The filters below it narrow the current category down: tick one or more of them, and an entity shows if it matches any of them. The search and the filters work together.
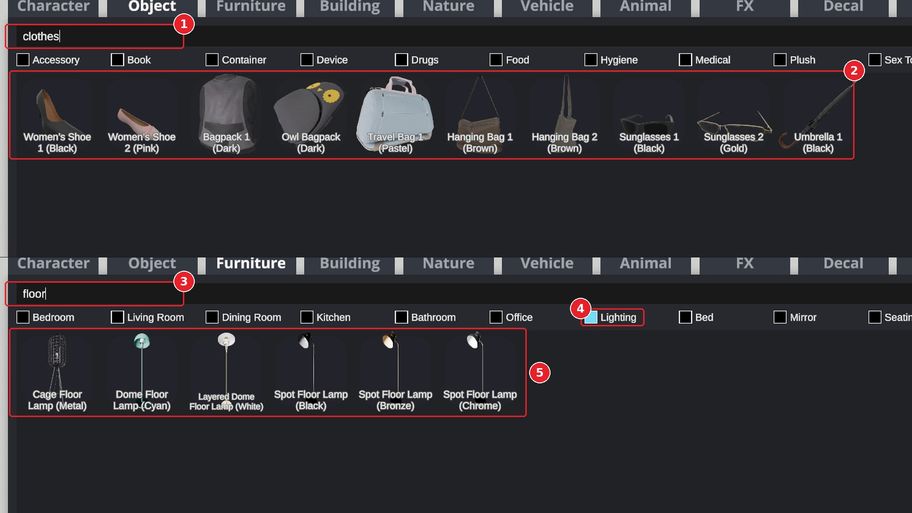
① In the Object tab, the search clothes...
② ...finds shoes, bags, sunglasses and an umbrella: none of them has "clothes" in its name, but all of them have this tag.
③ In the Furniture tab, the search floor...
④ ...with the Lighting filter ticked...
⑤ ...shows only the floor lamps.
⑤ Entity Grid
Shows the entities of the current category. Click one to add it to the scene: it appears in front of the scene camera, right where you are looking. Entities that stand on something, such as characters, plants, or furniture, should land exactly on the ground.
The new entity is added to every Step of the current environment, at the same place.
7. Moving Entities
Select an entity in the scene to show its panels: the Transform Panel at the bottom left, and the Gizmo Panel at the bottom right.
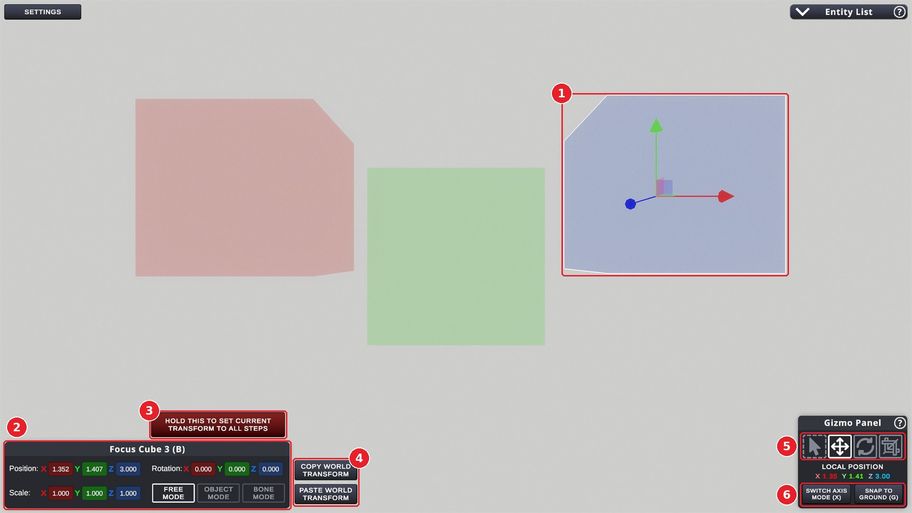
① Selected Entity
The selected entity is outlined, and its gizmo lets you move, rotate, and scale it with the mouse. Here, the gizmo is in Move mode: drag one of the arrows to move the entity along that axis.
② Transform Panel
Shows the name of the entity and its exact Position, Rotation, and Scale on the X, Y, and Z axes. Type a value in any field to set it precisely.
The position and the rotation of an entity can change from one Step to the next. Building structures are the exception: they stay in the same place in every Step.
The three buttons below set how the entity is placed:
- Free Mode: the entity is placed freely in the scene.
- Object Mode: the entity is attached to another object and follows it (e.g., food in a plate).
- Bone Mode: the entity is attached to a bone of a character or of an animated entity (e.g., a phone in a hand). See 22. Attaching Entities.
Some entities cannot be attached: their modes are greyed out, like on the focus cube above.
③ Set Transform to All Steps
Hold this button to copy the current position and rotation of the entity to every Step of the current environment. You have to hold it for 3 seconds, because this action is heavy and cannot be undone.
④ Copy and Paste World Transform
Copy World Transform remembers the position and rotation of the entity in the world. Select another entity, or another Step, and click Paste World Transform to apply them.
⑤ Gizmo Modes
Switches the gizmo between Hidden, Move, Rotate and Scale (keys 1 to 4). Below the buttons, the panel shows the position, the rotation, or the scale of the entity, depending on the gizmo mode, in global or local axes.
⑥ Switch Axis Mode and Snap to Ground
- Switch Axis Mode (X) switches the gizmo axes between Global (aligned with the world) and Local (aligned with the entity).
- Snap to Ground (G) drops the entity onto the closest collider below it.
Selecting Several Entities
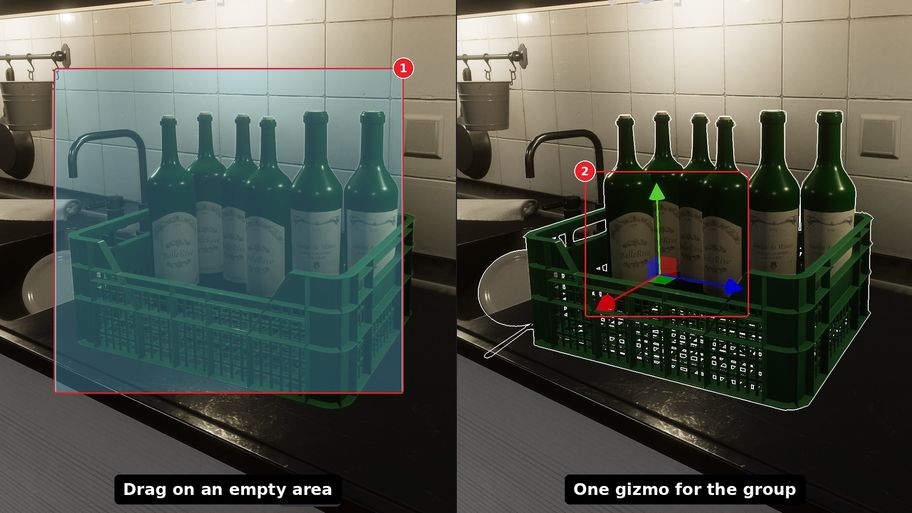
① Hold the left button and drag on an empty part of the scene to draw a selection box. An entity is selected when its center (its pivot point) is inside the box. Ctrl+click adds or removes one entity, and Shift+click removes it.
② The selected entities share one gizmo, placed at their center: move them all at once.
Rotating Several Entities
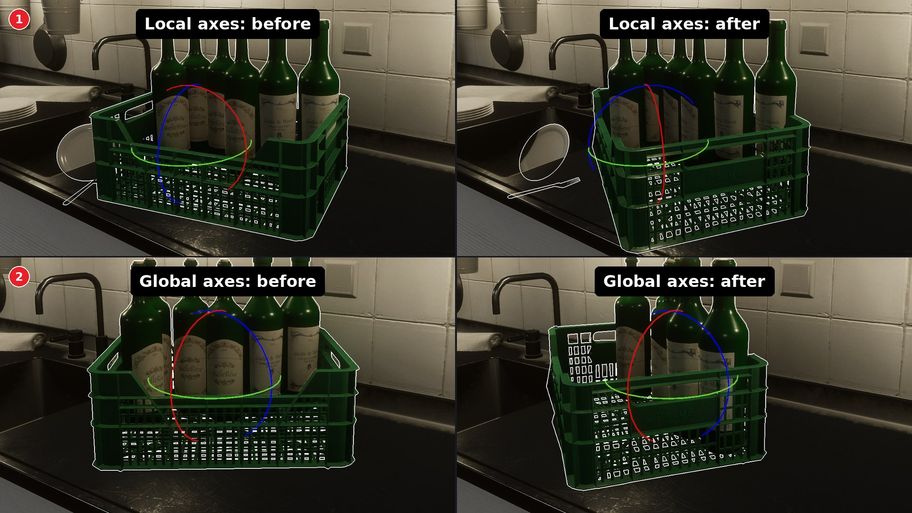
① With Local axes, each entity turns on itself: the crate turns, but the bottles stay in a row where they were. The gizmo follows the rotation of the first entity you selected.
② With Global axes, the whole group turns around its center, as one block: the bottles turn with the crate.
Press X (Switch Axis Mode) to switch between the two.
Scaling
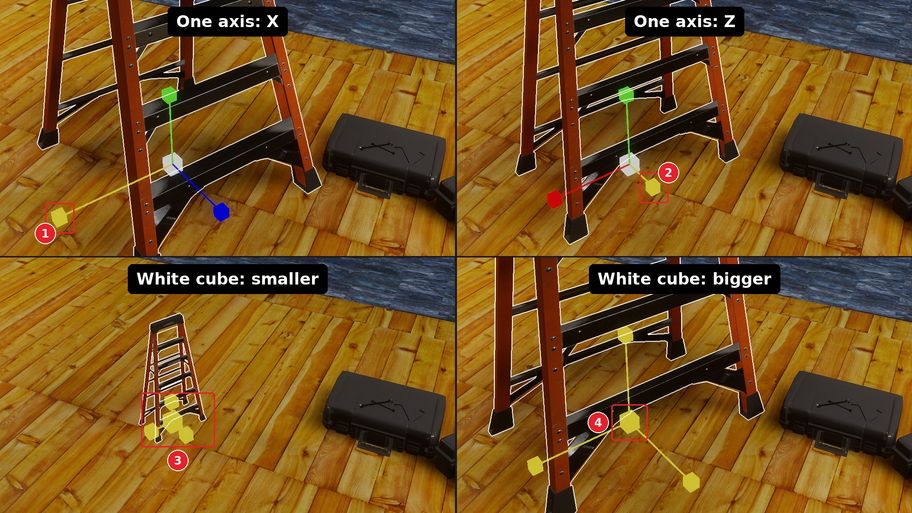
In Scale mode (4), the gizmo has one cube per axis and a white cube in its center. The cube you drag turns yellow.
① Drag the cube of the X axis to stretch the entity along X only: here, the ladder gets wider.
② The same along Z: here, the ladder gets thinner.
③ Drag the white cube in the center to scale the whole entity evenly. Move the mouse left or down to make it smaller...
④ ...and right or up to make it bigger.
With the gizmo, each axis goes from 0.1 to 100. Type a value in the Transform Panel for an exact size. Scaling works on one entity at a time, and Lucid characters cannot be scaled.
Global and Local Axes
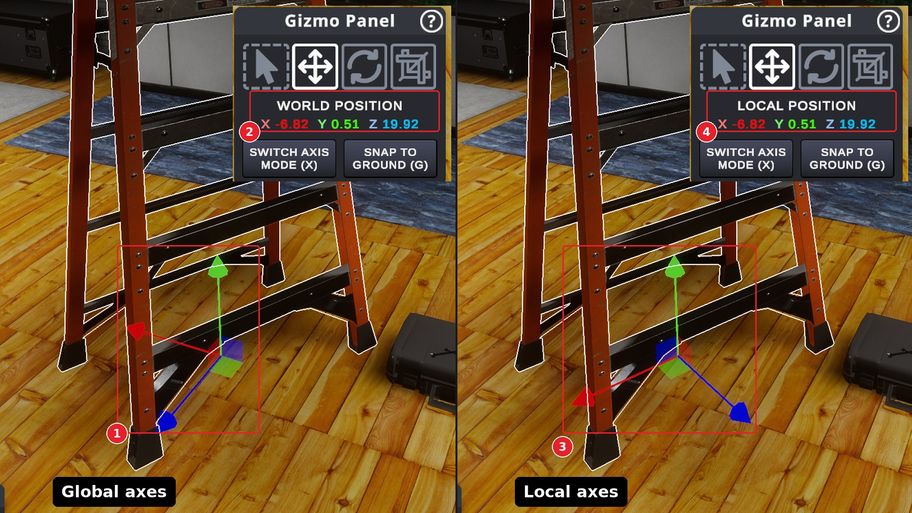
① With Global axes, the arrows of the gizmo follow the world, regardless of the entity's rotation.
② The Gizmo Panel shows WORLD POSITION.
③ With Local axes, the arrows follow the rotation of the entity: the ladder is turned, so are its arrows. Drag the red arrow to move the ladder sideways, relative to itself.
④ The Gizmo Panel shows LOCAL POSITION. For an entity that is not attached to anything, the numbers are the same in both modes: only the direction of the arrows changes. For an attached entity, the local values are measured from what it is attached to.
8. Steps: the Basics
A Step is one moment of your scenario: a full snapshot of the scene (where every character and object stands, the lights, the camera) and what the player has to do to move on. A new Step starts as a copy of the previous one, so you only change what moves.
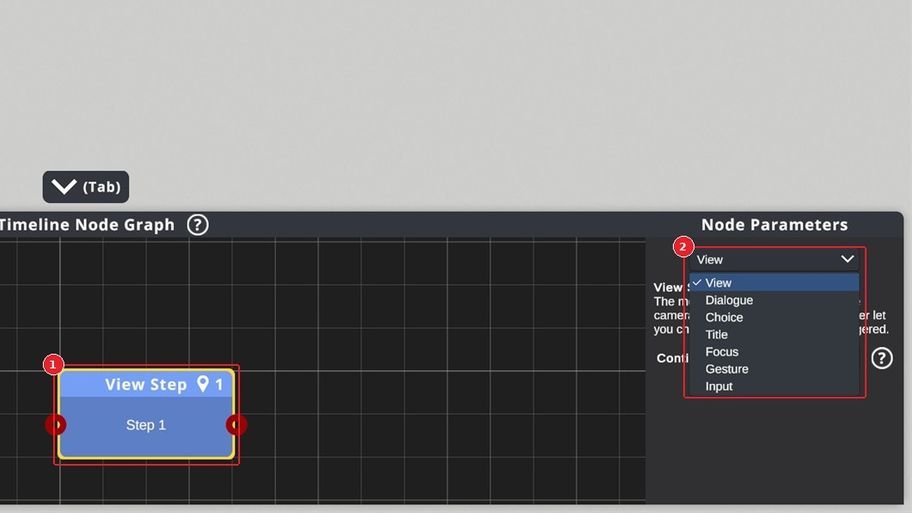
① Select a Step node in the graph.
② Choose its type at the top of the Node Parameters. There are seven Step types:
- View: shows the scene, the simplest step. See 9. View Step.
- Dialogue: shows text and/or plays a voice. See 10. Dialogue Step.
- Choice: lets the player choose between several options. See 11. Choice Step.
- Title: shows a full-screen text and/or image. See 12. Title Step.
- Focus: checks where the player is looking. See 13. Focus Step.
- Gesture: asks the player to move the mouse in a certain way. See 14. Gesture Step.
- Input: asks the player to type a value. See 15. Input Step.
9. View Step
The View Step is the most basic Step: it only shows the camera view of the scene.
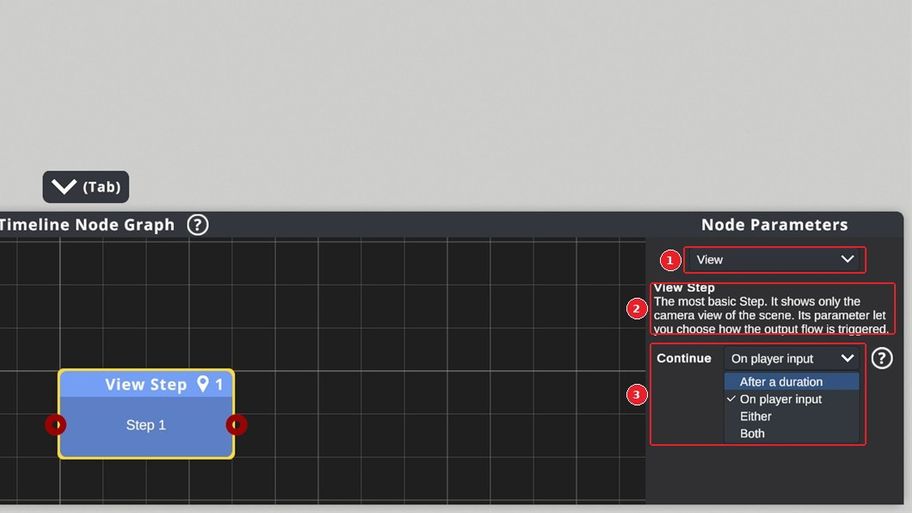
① The Step type, here View.
② A short description of the Step type.
③ Continue decides when the scenario moves on to the next Step:
- After a duration: waits a number of seconds, then continues.
- On player input: waits for a left-click, then continues.
- Either: continues as soon as one of the two happens: the end of the duration or a left-click.
- Both: continues only once the duration has passed and the player has left-clicked.
During a View Step, the player can look around with the mouse, within the limits set in the Camera Settings.
Tip: a View Step that lasts 0.01 second is skipped at once and can be used as a waypoint between two Blends to build smooth and complex camera moves.
10. Dialogue Step
The Dialogue Step shows text and/or plays an audio dialogue. The audio can be linked to a character or to a narrator voice.
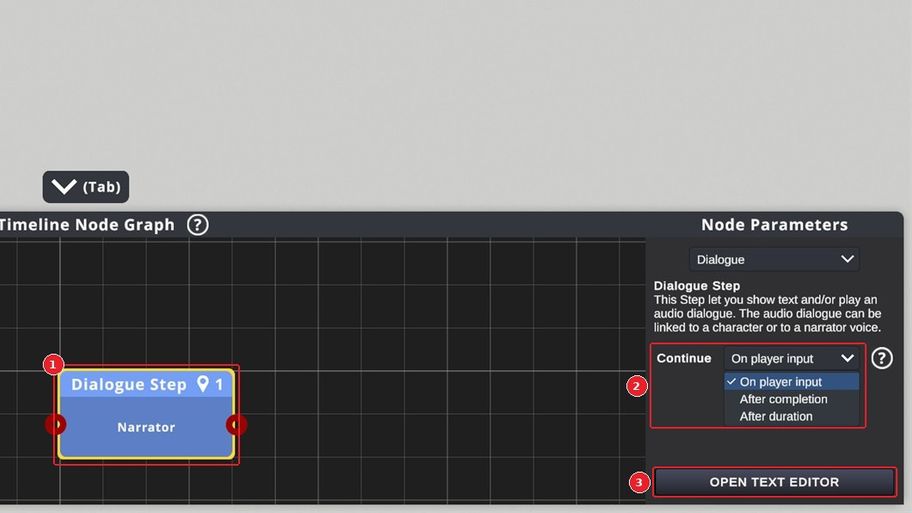
① The node shows who is speaking; here, the Narrator.
② Continue decides when the scenario moves on:
- On player input: waits for a left-click once the message is fully displayed. If the dialogue box uses the typewriter effect, the first click reveals the whole text at once, and the second click continues.
- After completion: continues automatically once all the text is displayed and all the audio (text-to-speech or audio file) has finished playing.
- After duration: continues automatically after a set number of seconds from the start of the Step, whether or not the text or the audio has finished.
③ Open Text Editor opens the editor where you write the dialogue.
Text Editor
Click Open Text Editor in the Node Parameters of a Dialogue Step. The editor opens full screen, over the view of the Player Camera, with a live preview of the dialogue exactly as the player will see it.
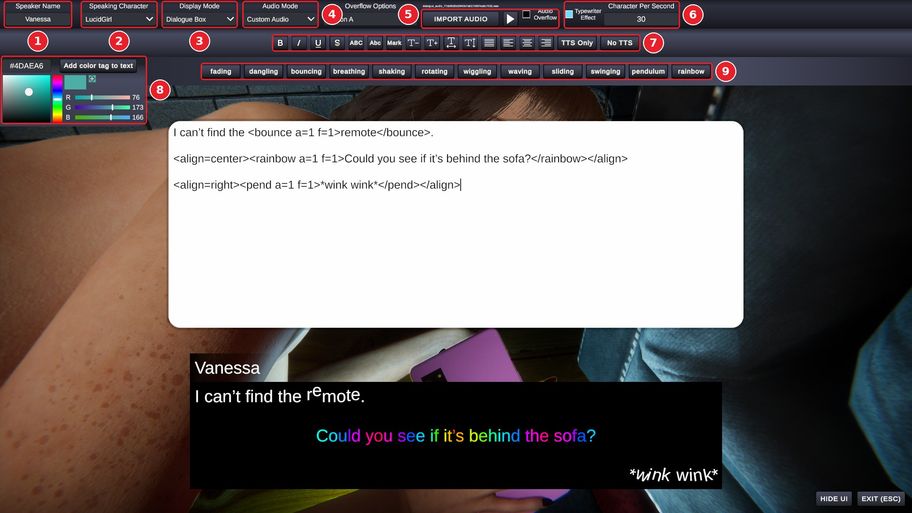
① Speaker Name: the name shown above the text, in Dialogue Box mode. Type anything you like: it does not have to match the Speaking Character.
② Speaking Character: Narrator, or one of the characters in the environment of this Step. The voice comes from this character, with lip sync, and the text-to-speech uses the voice of its character card. With Narrator, a Narrator Voice list appears to choose the voice.
③ Display Mode: Dialogue Box, Subtitle or None (Audio only). See the picture below.
④ Audio Mode:
- TTS: the text is read aloud by text-to-speech.
- Custom Audio: plays an audio file of your own, such as a recorded voice (WAV, OGG, or MP3, up to 256 MB).
- None: no sound.
⑤ Import Audio picks the audio file, and the play button previews the audio. Audio Overflow: when it is ticked, the audio keeps playing after the player moves on to the next Step. When it is off (the default), the audio stops at the end of the Step. A new line from the same speaker always stops the previous one.
⑥ Typewriter Effect reveals the text letter by letter, at the speed set in Character Per Second (1 to 200, 30 by default). Dialogue Box mode only.
⑦ The formatting buttons: select some text and click a button to apply it. Without a selection, the button inserts its tags at the cursor, ready for you to type between them. See 10.2.
⑧ Add color tag to text colors the selected text with the color chosen in the color picker panel.
⑨ The text animations, such as bouncing, shaking, or rainbow. Dialogue Box mode only.
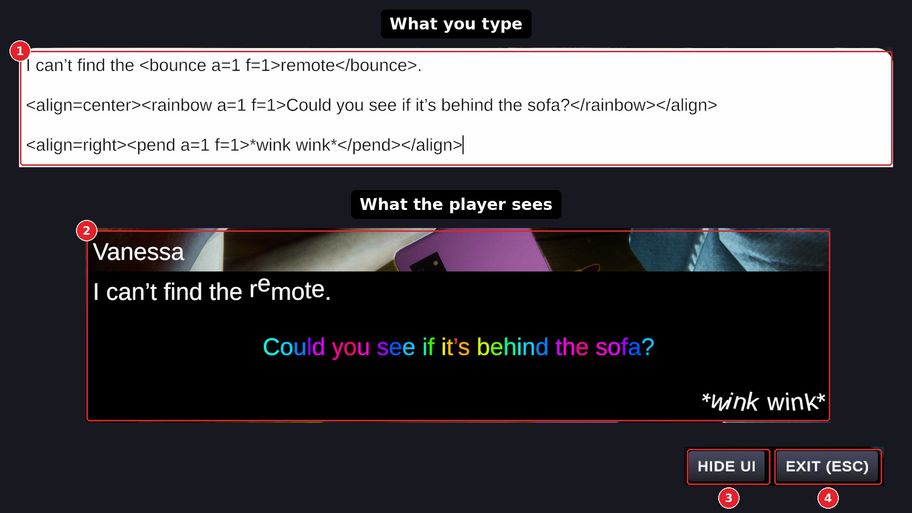
① The text field. Formatting is written with tags between < and >: the buttons insert them for you, and you can also type them yourself.
② The live preview: "remote" bounces, the question is centered and in rainbow colors, and "*wink wink*" swings on the bottom right.
③ Hide UI hides the editor to see the dialogue alone, as the player will. Press any key or click to bring the editor back.
④ Exit (Esc) closes the editor. Your text and settings are kept.
Tip: the editor has its own undo history. Ctrl+Z and Ctrl+Y undo and redo your typing word by word, and every change of setting.
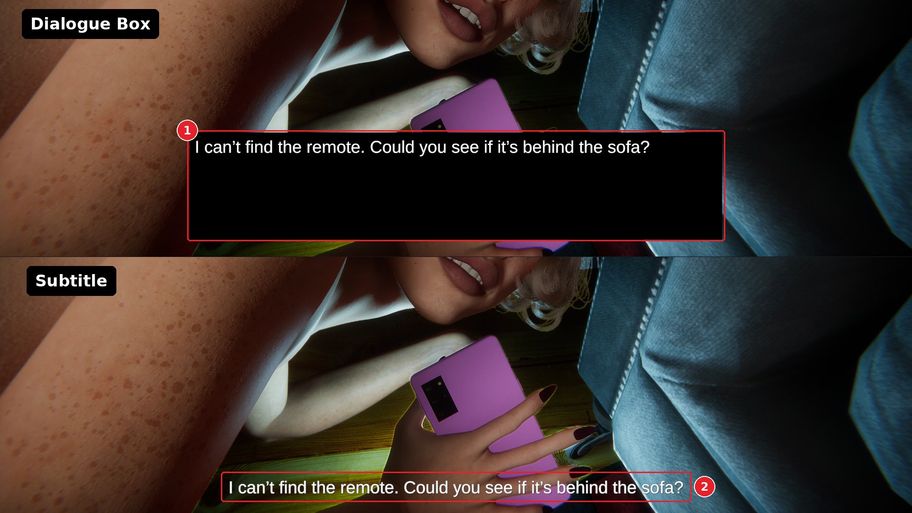
The Display Mode sets how the player sees the text:
① Dialogue Box: the text appears in a box at the bottom of the screen, under the Speaker Name, with the typewriter effect and the text animations.
② Subtitle: the text appears all at once at the bottom of the screen, like the subtitles of a film, without typewriter effect or text animation.
The third mode, None (Audio only), plays the voice without showing any text.
Title Steps use the same editor but with the text tools only (text animations do not play in Title Steps).
Text Effects and Tags
A. Formatting buttons
The formatting buttons and their tags
- B: <b>Bold</b> (shortcut: Ctrl+B)
- I: <i>Italic</i> (shortcut: Ctrl+I)
- U: <u>Underline</u> (shortcut: Ctrl+U)
- S: <s>
Struckthrough</s> - ABC: <uppercase>CAPITAL LETTERS</uppercase>
- Abc: <smallcaps>Small capitals</smallcaps>
- Mark: highlights the text in yellow, like a marker pen (<mark></mark>).
- T− and T+: smaller and bigger text (<size=75%></size> and <size=150%></size>).
- The two spacing buttons: the space between the letters and between the lines.
- The four alignment buttons: justified, left, centered, and right (<align=...></align>).
- TTS Only: the text is spoken by the text-to-speech, but not shown (<ttsonly></ttsonly>).
- No TTS: the text is shown, but not spoken (<notts></notts>).
B. Text animations
Each button on the animation bar inserts its tag; for example, the bouncing button will insert <bounce a=1 f=1></bounce>.
Every animation has two settings:
- a, the amplitude: a=2 moves twice as much, a=0.1 is very light. Use a dot for decimals.
- f, the speed: f=2 is twice as fast, f=0.5 twice as slow.
There is no limit, and negative values reverse the movement.
All the text animations
- fading: <fade a=1 f=1></fade>
- dangling: <dangle a=1 f=1></dangle>
- bouncing: <bounce a=1 f=1></bounce>
- breathing: <breathe a=1 f=1></breathe>
- shaking: <shake a=1 f=1></shake>
- rotating: <rot a=1 f=1></rot>
- wiggling: <wiggle a=1 f=1></wiggle>
- waving: <wave a=1 f=1></wave>
- sliding: <slide a=1 f=1></slide>
- swinging: <swing a=1 f=1></swing>
- pendulum: <pend a=1 f=1></pend>
- rainbow: <rainbow a=1 f=1></rainbow>
Animations only play in Dialogue Box mode.
C. Variables
Type <var:name> to show the current value of a variable, for example "Welcome, <var:playerName>!". It works in dialogues (shown and spoken), in the choices of a Choice Step and in the prompt of an Input Step, but not in Title Steps or in the Speaker Name. A Flag shows 1 or 0. The editor preview shows the tag itself: the value appears during a test.
D. Everything else
The text engine of the game is TextMesh Pro, and the editor accepts all of its rich text tags: fonts, sizes, colors, spacing, superscript, and many more. See the list of TextMesh Pro tags.
11. Choice Step
The Choice Step displays a list of choices. When the player selects one, the flow continues through the matching output. An optional time limit turns it into a quick time event (QTE).
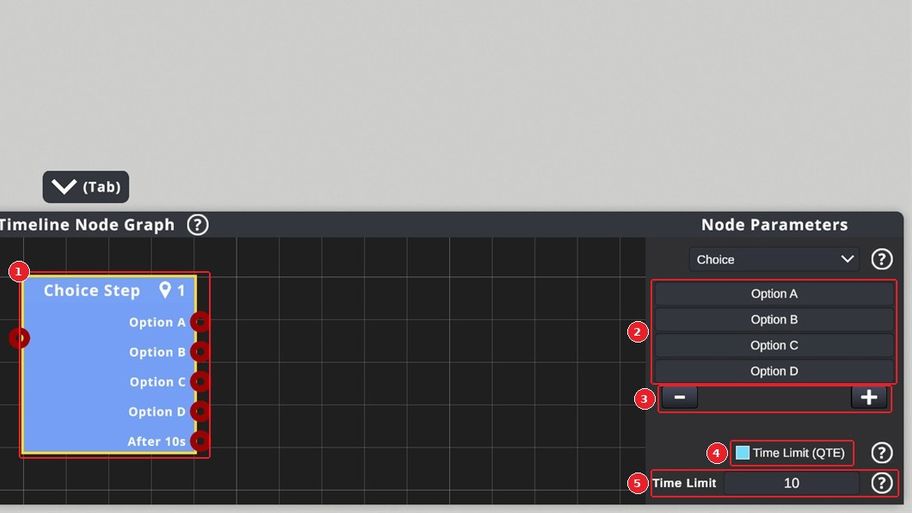
① The node has one output for each choice, plus an After Xs output when the time limit is enabled.
② The list of choices: click a choice to type its text.
③ − removes the last choice and + adds a new one. A Choice Step has a minimum of 2 and a maximum of 6 choices.
④ Time Limit (QTE) adds a "time exceeded" output, used when the player does not answer before the time runs out.
⑤ Time Limit: how long the player has to answer, from 1 to 360 seconds. A bar shows the player how much time is left.
Choices can show the value of a variable with a <var:name> tag.
A complete example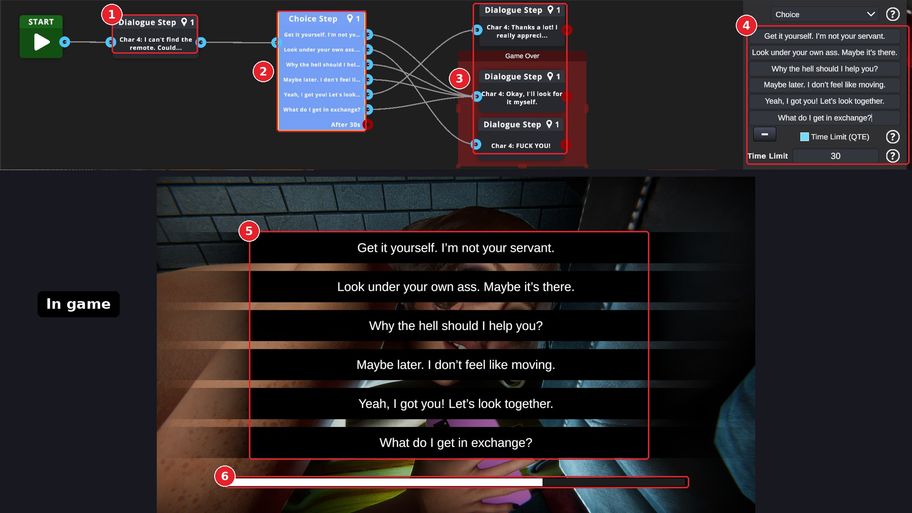
① A Dialogue Step asks the question: "I can't find the remote. Could you see if it's behind the sofa?"
② The Choice Step offers six answers, with a time limit of 30 seconds.
③ Each answer leads to a reply. Several answers can lead to the same reply.
④ The six answers and the time limit, in the Node Parameters.
⑤ In-game, the answers are shown over the scene, one bar per answer. The player clicks one of them.
⑥ The bar empties as the time runs out. Here, the After 30s output is not linked: if the player does not answer in time, the scenario ends.
12. Title Step
The Title Step shows full-screen text: a title, a chapter name, a page of text, or any other full-screen writing. It is great for introductions, chapter breaks, and interludes. When it is linked to the input of an Environment node, it also serves as a loading screen inside the scenario.
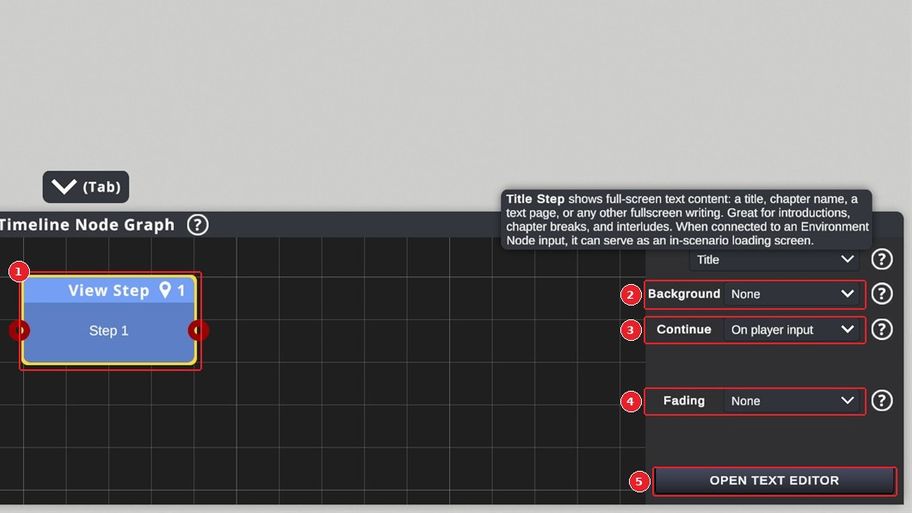
① The Title Step node.
② Background: None, a Color, or an Image.
③ Continue: On player input, After duration, or Input or duration (whichever comes first).
④ Fading: None, Fade in, Fade out, or Smooth (fade in and out). The display duration starts once the fade-in is over, so the whole Step lasts the fade-in, plus the duration, plus the fade-out. A click during the fade-in shows the text at once.
⑤ Open Text Editor opens the Text Editor, to write the text of the page.
13. Focus Step
The Focus Step lets you place invisible focus zones in the scene, in three colors: Red, Green, and Blue. While the Step runs, the game tracks where the player is looking, which is the center of the screen, and continues through the output of the matching color, or through White if the player looked at none of them.
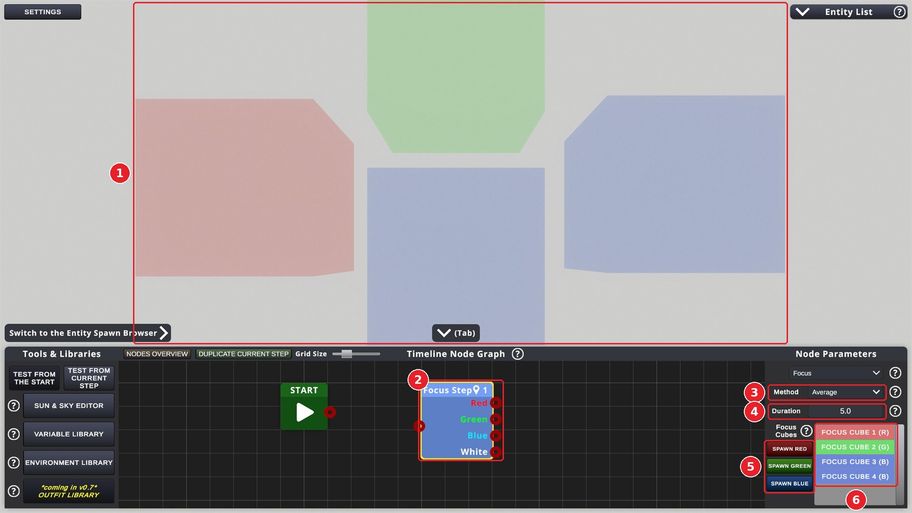
① The focus cubes in the scene. Move, rotate, and resize them like any other entity to cover the areas you want. Several cubes of the same color act as one zone, so you can build zones of almost any shape. The cubes are invisible to the player, and they only exist in their own Focus Step.
② The node has four outputs: Red, Green, Blue, and White.
③ Method:
- Average picks the zone looked at the most over the whole duration. Looking at no zone counts as White, so White wins if the player looked away most of the time.
- Final picks the zone looked at at the end of the step.
④ Duration: how long the player's focus is tracked, in seconds, before the result is chosen.
⑤ Spawn Red, Spawn Green and Spawn Blue add a focus cube of that color to the scene.
⑥ The list of the focus cubes of the Step. Click one to select its cube.
Walls don't block the gaze: a cube behind a wall still counts when the player looks toward it. During a Focus Step, the player can look around with the mouse, within the limits set in the Camera Settings.
14. Gesture Step
The Gesture Step lets the player act on the scene with the mouse. An invisible gesture cube travels back and forth between its starting point and a goal cube, following the movements of the player's mouse. Objects and bones (like hands and feet) can be attached to the gesture cube, so that a character, an object, or multiple entities follow the player's gesture.
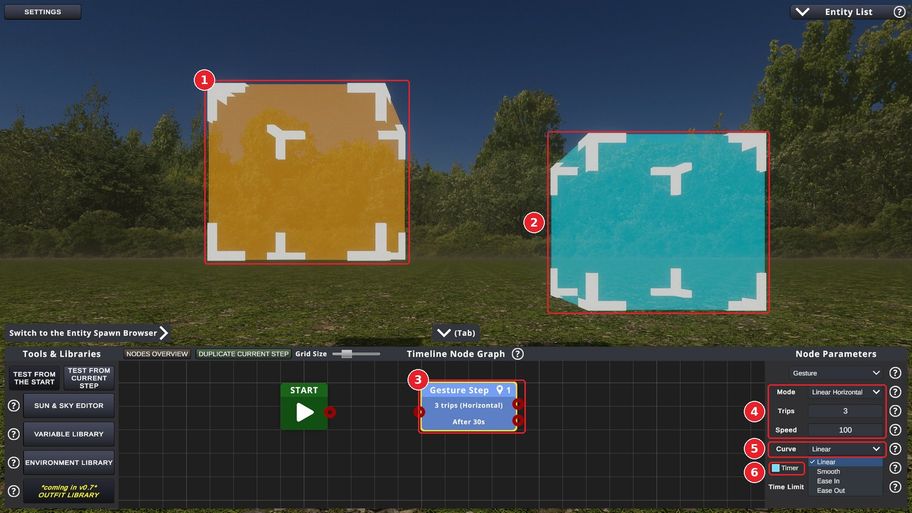
① The gesture cube (orange) is the cube that moves. Attach objects or bones to it the same way you attach them to any object.
② The goal cube (cyan) marks the other end of the movement. Going from one cube to the other is one trip. If the goal cube is rotated, the gesture cube also turns during the trip; use it to twist a hand, for example. Both cubes are invisible to the player, and they only exist in their own Gesture Step.
③ The node shows a summary of the Step, and an After Xs output when the timer is enabled.
④ Movement settings:
- Mode: Linear Horizontal (the player moves the cursor left and right), Linear Vertical (up and down), or Free (in any direction, every movement counts).
- Trips: how many trips the player has to complete to finish the Step.
- Speed: how far the gesture cube moves for a given movement of the mouse (100 by default).
⑤ Curve: how the gesture cube moves during each trip:
- Linear: at a constant speed.
- Smooth: starts gently, speeds up in the middle, then slows down near the end.
- Ease In: starts slowly and speeds up toward the end.
- Ease Out: starts quickly and slows down near the end.
⑥ Timer adds a "time exceeded" output, used when the player does not complete enough trips before the time runs out. Once it is enabled:
- Progress Bar shows the player a bar with the time left.
- Time Limit sets how long the player has, in seconds.
15. Input Step
The Input Step shows a text field, so the player can type a value (text or number) that is stored in a variable of the scenario. Ask for the player's name, a password, an answer to a riddle, anything.
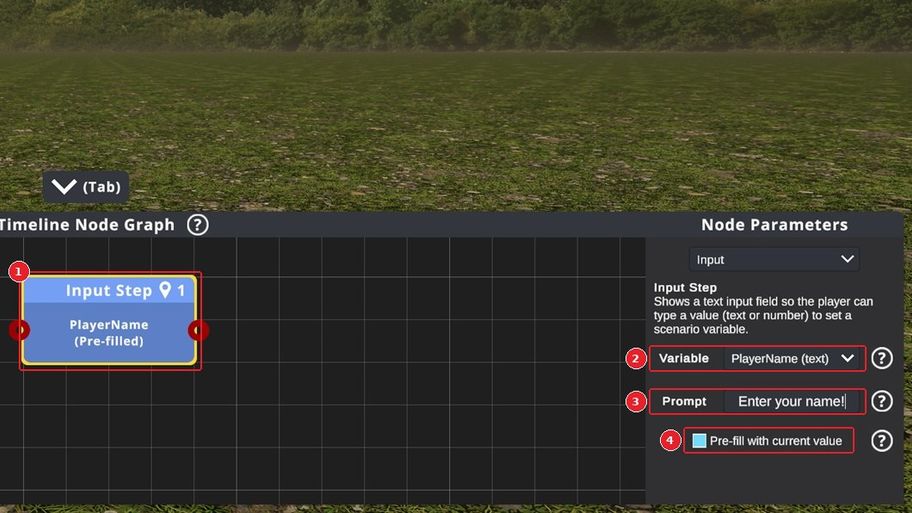
① The node shows the variable used, and "(Pre-filled)" when the field starts with its current value.
② Variable: the text or number variable that stores the answer. A number variable only accepts whole numbers. Create it first in the Variable Library: until a text or number variable exists, the Step asks you to create one.
③ Prompt: an optional message that tells the player what to type, for example, "Enter your name".
④ Pre-fill with current value: the field starts with the current value of the variable. When it is off, the field starts empty.
16. Variable Library
Variables let your scenario remember things: the player's name, a score, whether a door was opened... The Variable Library, opened from Tools & Libraries, lists all of them.
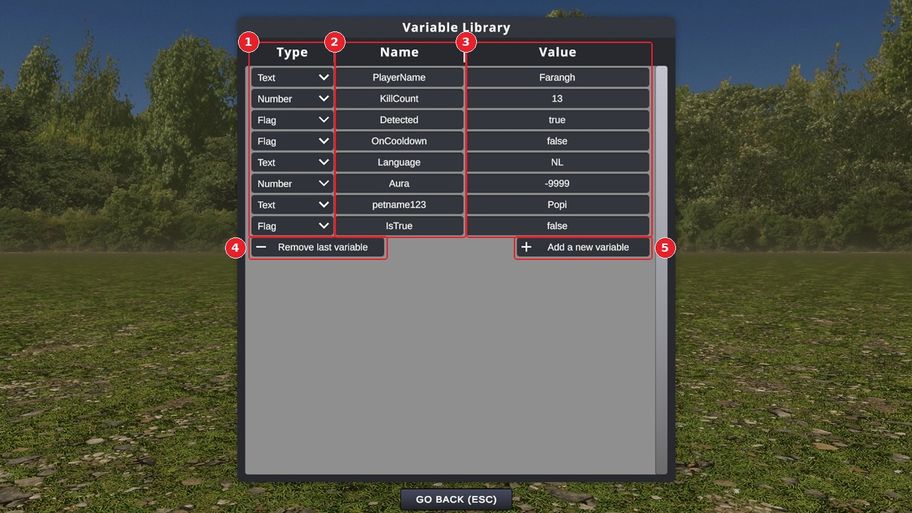
① Type:
- Flag: true or false.
- Text: a word or a sentence.
- Number: a whole number, which can be negative.
② Name: the name of the variable, used to find it everywhere in the scenario. To show it in a text with a <var:name> tag, use only letters, digits, _ and - in the name.
Careful: the nodes that use a variable are not updated when you rename or remove it. Check them afterwards.
③ Value: the value of the variable when the scenario starts.
④ Remove last variable deletes the last variable of the list.
⑤ Add a new variable adds one at the end of the list.
Click Go Back (or press Escape) to close the library.
17. Environment Library
Every scenario takes place in one or more environments, such as an industrial loft or a forest. The Environment Library, opened from Tools & Libraries, lists the environments of your scenario. A single scenario can use up to 50 environments.
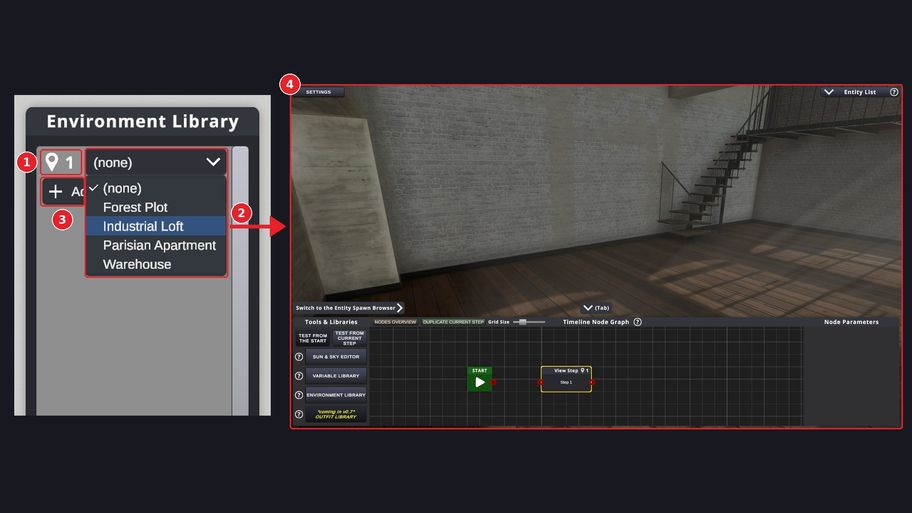
① Each environment has a number, shown with a pin icon. The same pin and number appear in the header of every Step node that takes place in this environment.
② Choose the map of the environment in the list, here Forest Plot, Industrial Loft, Parisian Apartment, or Warehouse.
③ Add a new environment adds a new numbered environment to the list and a first View Step for it, named "Step (Env N)", in the graph. Environments cannot be removed.
④ The environment loads in the scene, ready to be filled.
The entities belong to the environment number, not to the map: if you choose another map for an environment, everything you placed stays at the same coordinates in the new map, in every Step of that environment. The sky of these Steps goes back to the default sky of the new map.
Tip: every map you visit stays loaded until you close the scenario, while two environments using the same map share it. Reuse maps when you can.
To go from a Step in one environment to a Step in another, link them through an Environment node.
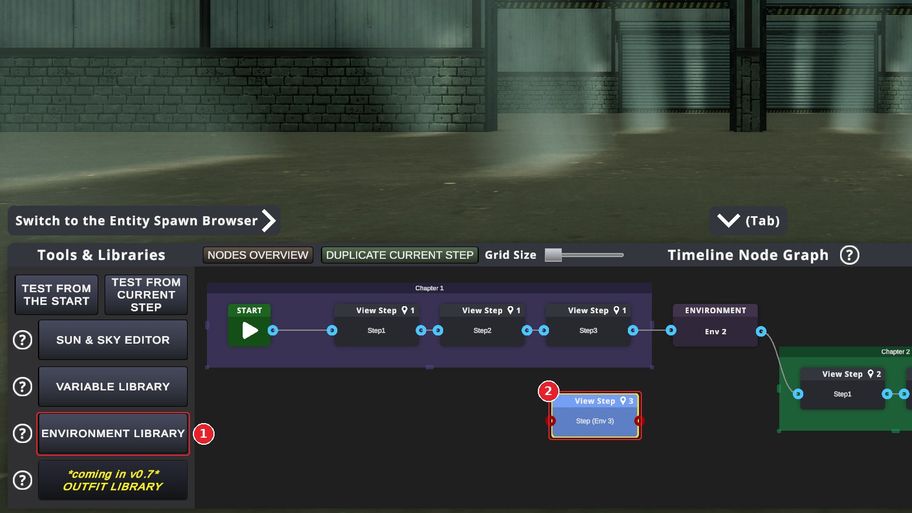
① Open the Environment Library and click Add a new environment.
② The first Step of the new environment appears in the graph at once: a View Step named Step (Env 3), with the pin and the number of the new environment. It is not linked to anything yet: lead to it through an Environment node set to this environment.
18. Sun & Sky Editor
The Sun & Sky Editor, opened from Tools & Libraries, sets the sun, the sky, and the clouds. Like everything else in the scene, these settings belong to the current Step: change them from one Step to the next, and a Blend node moves the sun smoothly between two Steps.
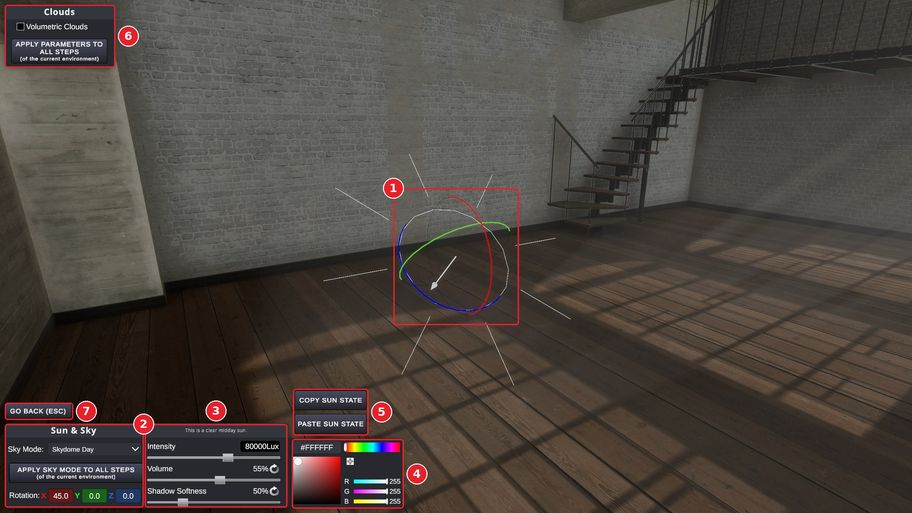
① Sun gizmo: drag its rings to turn the sun and change the direction of its light and shadows.
② Sky Mode chooses the sky of the Step (here, Skydome Day). The list depends on the map (some maps have special global effects like rain or snow). Apply Sky Mode to All Steps uses this sky in every Step of the current environment. Rotation sets the direction of the sun precisely, in degrees.
③ Sunlight:
- Intensity: the strength of the sun in lux, up to 130,000 (80,000 by default). The line above it describes the result in plain words (here, "This is a clear midday sun.").
- Volume: how much the sunlight shows in the air, as visible light shafts, from 0 to 100% (10% by default). Perfect for creating fog.
- Shadow Softness: from sharp shadows to soft, blurry ones, from 0 to 200% (50% by default).
Tip: the round arrow next to a value resets it to its default.
④ Sun color, set with the color picker.
⑤ Copy Sun State and Paste Sun State copy the sun of a Step to another Step: its color, intensity, rotation, volume, and shadow softness. The sky and the clouds are not copied.
⑥ Clouds: 3D clouds in the sky. See Clouds below.
Careful: the two Apply ... to All Steps buttons cannot be undone.
⑦ Go Back (Esc) closes the editor.
Clouds
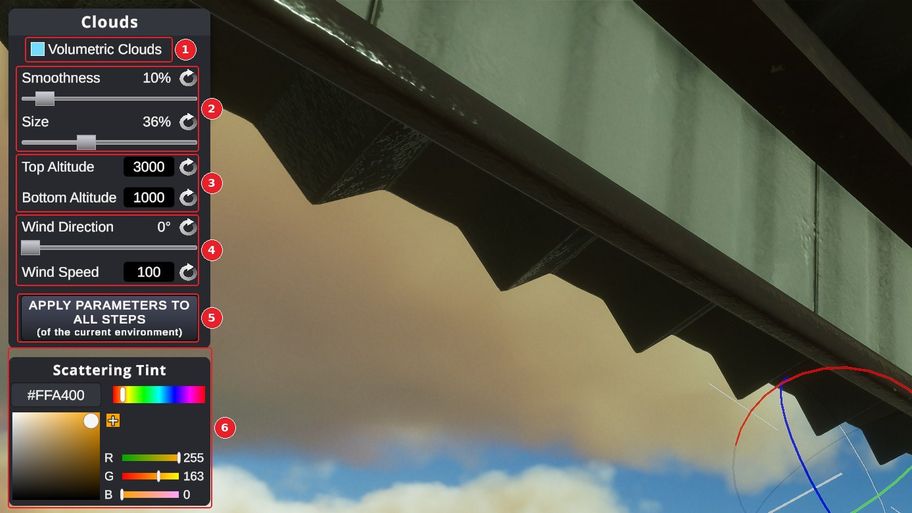
① Volumetric Clouds adds 3D clouds to the sky of the Step. They are off by default.
② Smoothness (1 to 100%, 10% by default): the higher it is, the softer the edges of the clouds. Size (1 to 100%, 10% by default): the size of the clouds. At 100%, they cover the whole sky.
③ Bottom Altitude: the height of the bottom of the cloud layer (1,000 by default). Top Altitude is in fact the thickness of the layer, counted from its bottom (3,000 by default): with these values, the clouds fill the sky from 1,000 to 4,000 m. Both go from 1 to 49,999.
④ Wind Direction (0 to 360°) and Wind Speed (0 to 99,999 km/h, 100 by default) move the clouds across the sky.
⑤ Apply Parameters to All Steps copies these cloud settings to every Step of the current environment. It cannot be undone.
⑥ Scattering Tint colors the light inside the clouds. Black, the default, means no tint.
Like the sun, the clouds belong to the current Step, and a Blend Node moves them smoothly from one Step to the next (perfect for creating a timelapse, for example).
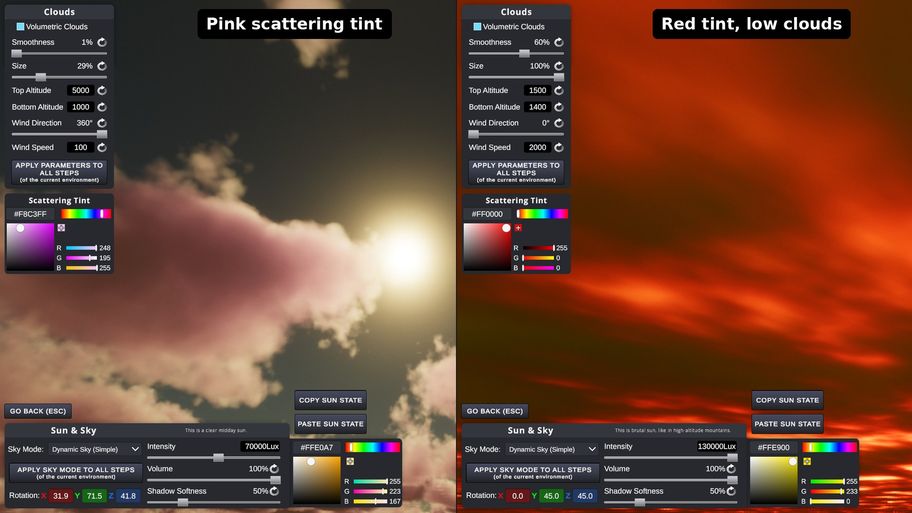
Two examples: a pink tint for a dreamy sky, and a red tint with big, low clouds for an apocalyptic one.
19. Player Camera
The Player Camera is what the player sees. Each Step has its own camera position and settings, so you can frame every moment like a shot in a film. In the scene, the Player Camera looks like a real camera: click it to select it.
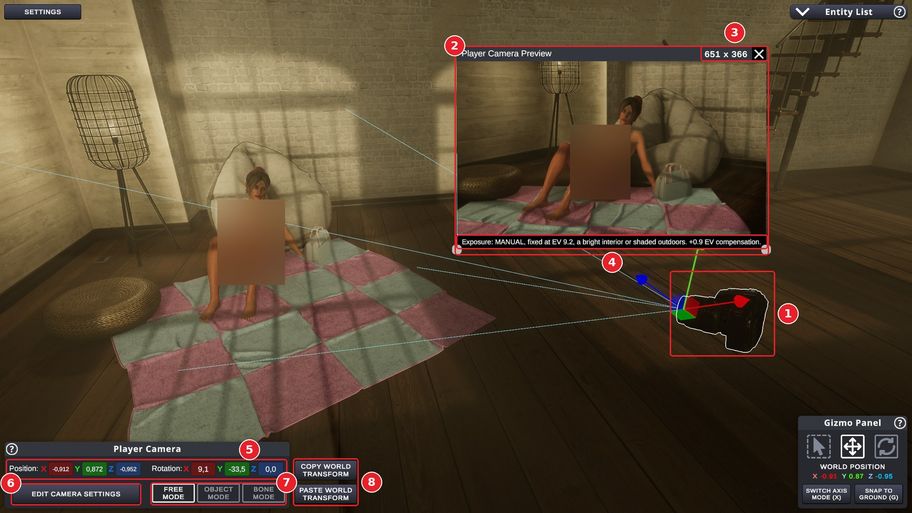
① The Player Camera in the scene. The lines show what it sees. Move and rotate it with the gizmo, like any entity.
② Player Camera Preview: press P to open a window that shows, live, exactly what the player will see, with every camera effect. Drag its title bar to move it, and its bottom corners to resize it, from 240×135 up to 960×540. The window remembers its place and size, and hides itself when you are already looking through the Player Camera.
Tip: the preview renders all the time, so close it when you don't need it, especially in large scenes.
③ The size of the preview and the button that closes it.
④ Exposure read-out: how the camera of the current Step is exposed, in plain words.
⑤ Position and Rotation of the camera, to type exact values.
⑥ Edit Camera Settings opens the Camera Settings.
⑦ Free, Object and Bone modes: like other entities, the camera can be attached to an object or to a bone of a character, and follow it.
⑧ Copy and Paste World Transform, as for any entity (see 7.4).
Camera Settings
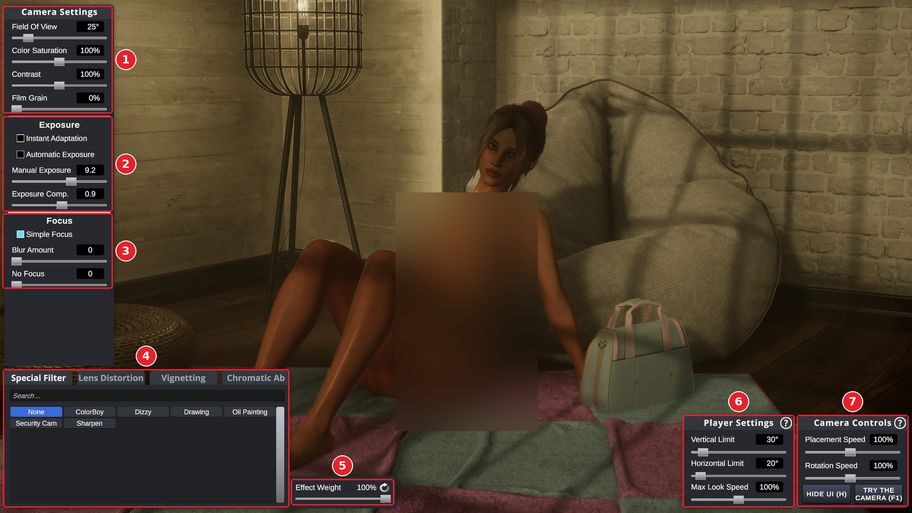
① Field Of View (the zoom of the camera, from 10° to 120°), Color Saturation and Contrast (100% is neutral), and Film Grain. Once the film grain is above 0, a second slider chooses the type of grain, from 1 to 10.
② Exposure:
- Automatic Exposure: the camera adapts to the light by itself, like an eye, between a minimum and a maximum exposure that you set. With Instant Adaptation, the image jumps instantly to the right exposure, instead of adapting progressively.
- Manual Exposure: a fixed exposure value (EV), from -10 to +20. The brighter the scene, the higher the value: the preview window describes it in plain words, for example "EV 9.2, a bright interior or shaded outdoors". Exposure Comp. brightens or darkens the image on top of it, from -15 to +15.
Tip: use manual exposure when you work on the lighting. With automatic exposure, the camera compensates for your light changes and hides them.
③ Focus: blurs what is out of focus. See Focus below.
④ Filters, in four tabs: Special Filter, Lens Distortion, Vignetting and Chromatic Aberration. Click an effect to apply it, or None to remove it. Hover an effect to preview it, and right-click it to add it to your favourites, shown first. See Filters below.
⑤ Effect Weight: the strength of the filter of the current tab. Each tab has its own weight.
⑥ Player Settings: during View and Focus Steps, the player can look around with the mouse, like in a first-person game. Vertical Limit and Horizontal Limit set the total angle the view can cover, up and down, and left and right: 0 locks the view, 360 frees it. Max Look Speed is the mouse sensitivity, 100% by default: 0 stops the player from looking around.
⑦ Camera Controls: Placement Speed and Rotation Speed set how fast YOU move and turn the camera while you place it (keys and right mouse button). They are not saved in the scenario and don't change anything for the player. Hide UI (H) hides the panels to see the whole picture, and Try the Camera (F1) lets you test the camera as the player, in the current Step, to check its limits and speeds.
Filters
A few examples, each at full strength:
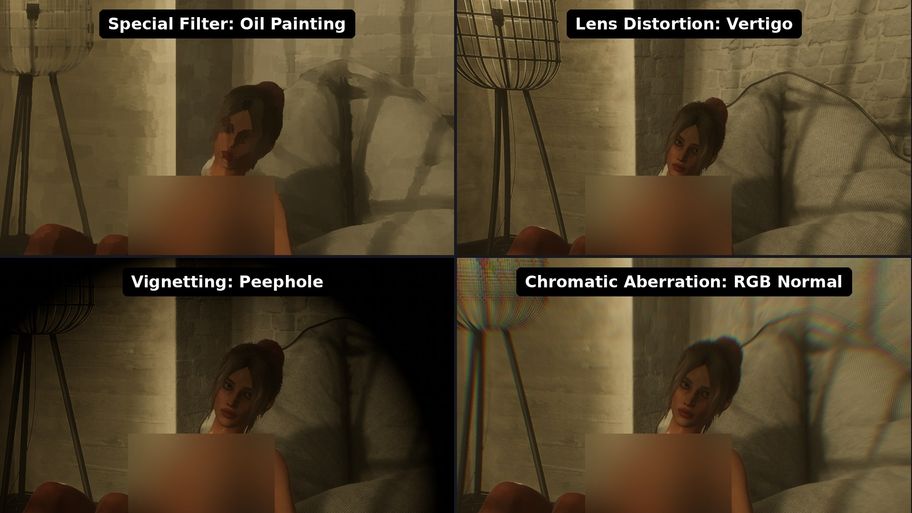
Focus
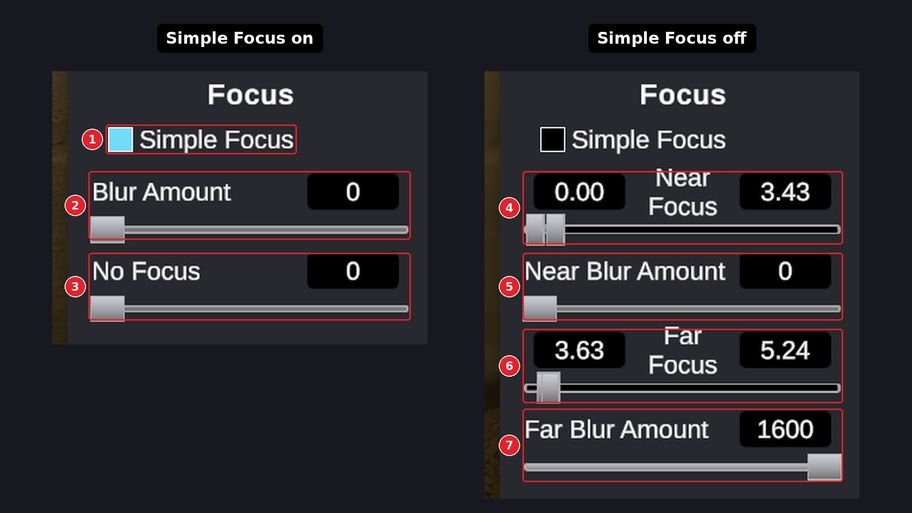
① Simple Focus switches between the simple settings (left) and the advanced settings (right).
② Blur Amount: how much the parts out of focus are blurred.
③ The focus preset, in five positions: No Focus (the whole image is blurred), Close Focus (sharp up to about 1 m), Shallow Focus (sharp up to about 2 m), Deep Focus (the foreground is blurred up to 3 m, the rest is sharp) and Background Focus (the foreground is blurred up to 5 m). At a Blur Amount of 0, nothing is blurred.
With Simple Focus off, you set the near blur and the far blur separately. Everything between the end of the near range and the start of the far range stays sharp.
④ Near Focus: the distances, in meters (0 to 50), where the blur of the foreground fades out.
⑤ Near Blur Amount: how much the foreground is blurred.
⑥ Far Focus: the distances, in meters (0 to 100), where the blur of the background fades in.
⑦ Far Blur Amount: how much the background is blurred.
20. Characters
Characters are added from the Character tab of the Entity Spawn Browser.
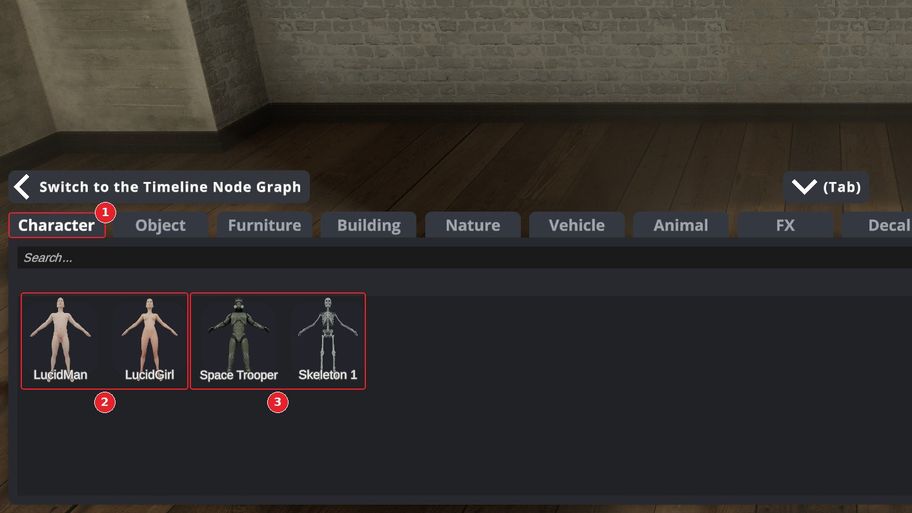
① The Character tab.
② Lucid Characters: Once they are in the scene, load your character card onto them.
③ Humanoid Entities: Those entities can play every body animation of Lucid Characters (with custom speed/mirror/reverse settings), but they have no expressions or IK/FK orbs.
Click a character to add it in front of the scene camera.
Selected Character
Select a character to show its panels.
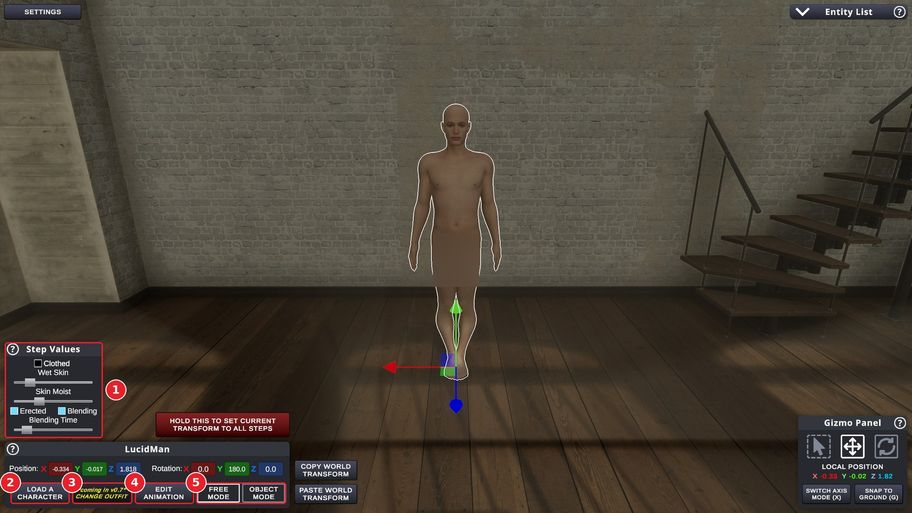
① Step Values: settings of the character that can change from one Step to the next.
- Clothed: dresses or undresses the character, with the outfit it wears in the current Step. A new character starts undressed.
- Wet Skin and Skin Moist: make the skin look wet or moist, for sweat or a shower scene.
- On male characters, Erected switches the penis between its aroused and relaxed states. Blending makes the change progressive, over the Blending Time.
② Load a Character loads a character card on this character. See Loading a Character Card below.
③ Change Outfit is coming in v0.7.
④ Edit Animation opens the animation and pose tools. See 21. Animation & Pose.
⑤ Free Mode and Object Mode: in Object Mode, the character is attached to a compatible entity and follows it when it moves.
The rest of the panel works like for any entity: see 7. Moving Entities.
Loading a Character Card
Click Load a Character to give the selected character the look and voice of one of your character cards.
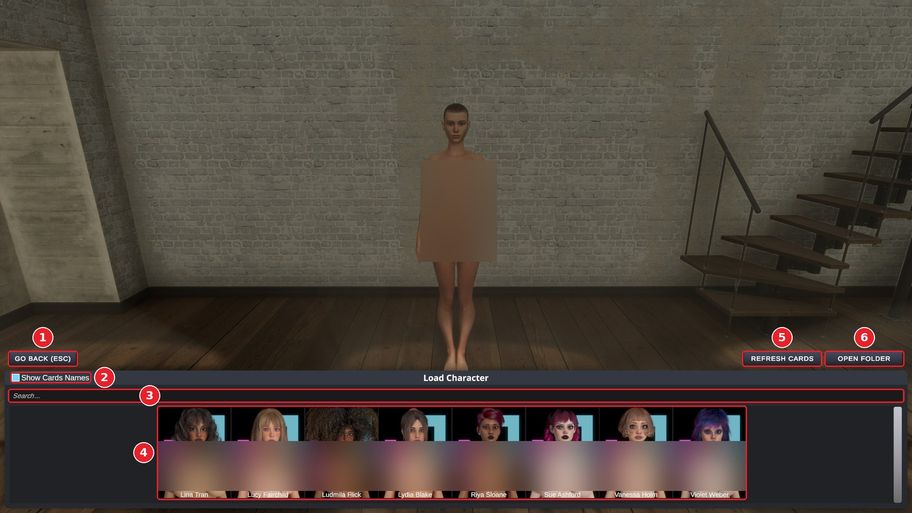
① Go Back (Esc) closes the list without loading anything.
② Show Cards Names shows or hides the name under each card.
③ Search: type a name to find a card quickly.
④ Your character cards. Click one to load it on the selected character: female cards on LucidGirl, male cards on LucidMan. The new look, and the voice of the card, apply to the character in every Step where it appears. The card is stored in the scenario, so the scenario no longer needs the card file. Loading a card cannot be undone, but the list stays open so you can try several cards.
⑤ Refresh Cards updates the list, for example, after you add new cards to the folder.
⑥ Open Folder opens the folder where your character cards are stored: characters/girls or characters/men, in the persistent data folder of the game.
21. Animation & Pose
Click Edit Animation in the panel of a character to animate and pose it. The animation and the pose belong to the current Step, so they can change from one Step to the next, and a Blend node moves the character smoothly from one pose to the next.
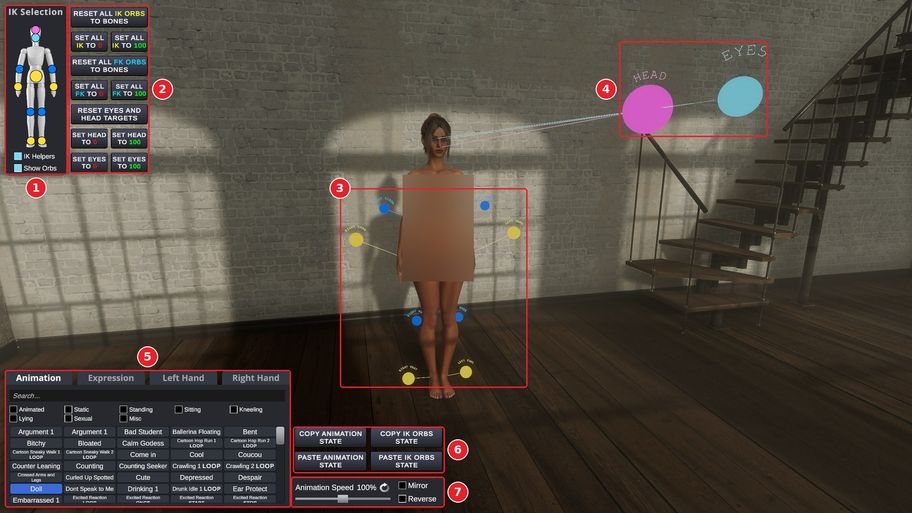
① IK Selection: a small figure with one dot per orb. Click a dot to select that orb. IK Helpers shows or hides the lines and the 3D labels of the orbs, and Show Orbs the orbs themselves.
② Buttons that act on all the orbs at once:
- Reset All IK Orbs to Bones and Reset All FK Orbs to Bones put the orbs back on their respective bones.
- Set All IK and Set All FK to 0 or 100 set the weight of all the orbs of that kind.
- Reset Eyes and Head Targets, Set Head to 0 or 100 and Set Eyes to 0 or 100 do the same for the head and the eyes.
③ The orbs on the body. Yellow orbs (IK) pull the hands, the feet, and the body. Blue orbs (FK) bend the elbows and the knees.
④ Head and Eyes targets: the character turns its head toward the pink target and looks at the cyan one.
⑤ Animation panel, in four tabs:
- Animation: the animation of the body. Search them by name, or tick the filters: Animated, Static, Standing, Sitting, Kneeling, Lying, Sexual and Misc. Animations marked LOOP play in a loop.
- Expression: the facial expression. See Expressions below.
- Left Hand and Right Hand: the poses of the hands.
Hover an item of a list to preview it, and right-click it to add it to the favorites of the scenario, shown first.
⑥ Copy and Paste Animation State copy everything at once: the animation and its settings, the expression, the hand poses, and all the orbs, attachments included. Copy and Paste IK Orbs State copy only the pose of the orbs, and the pasted orbs are detached. Paste them in another Step or on another character.
⑦ Animation Speed, Mirror (plays the animation with left and right swapped), and Reverse (plays it backwards).
Moving an Orb
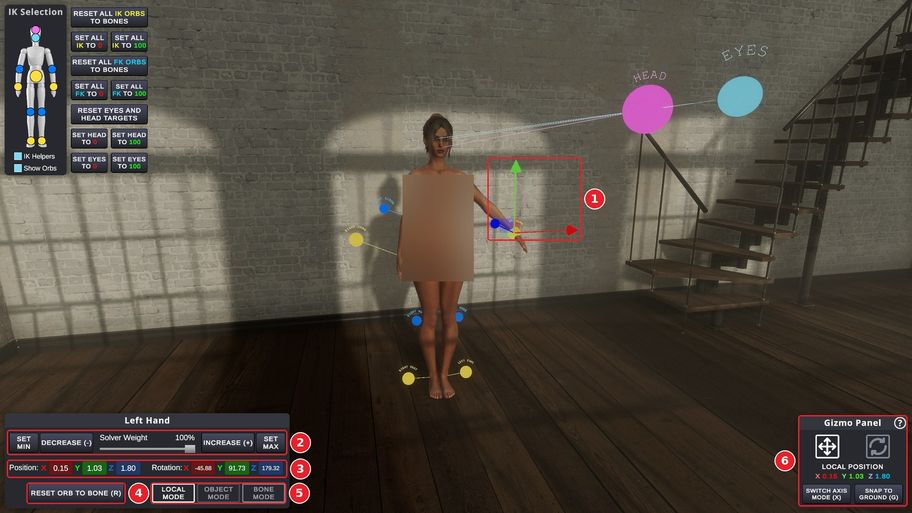
① Click an orb to select it (here, the left hand), then move or rotate it with the gizmo. The body part follows. While an orb is selected, the animation of the character pauses.
② Solver Weight: how much the orb controls the body part, from 0% (the animation alone) to 100% (the orb alone). Set Min, Decrease, Increase and Set Max change it quickly, by steps of 10%.
③ Position and Rotation of the orb, to type exact values.
④ Reset Orb to Bone (R) puts the orb back on its body part. The head and eyes targets go back 2 meters in front of the head.
⑤ Local, Object and Bone modes, for the yellow orbs and the head and eyes targets: in Local mode, the orb follows the character. In Object mode, it is attached to an object, and in Bone mode to a bone of another character or of an animated entity. The orb stays attached during a Blend Node.
Tip: attach the Eyes target to the head of another character, and the gaze follows them.
⑥ The gizmo of an orb only moves and rotates it. The blue orbs (elbows and knees) and the head and eyes targets can only be moved.
Expressions
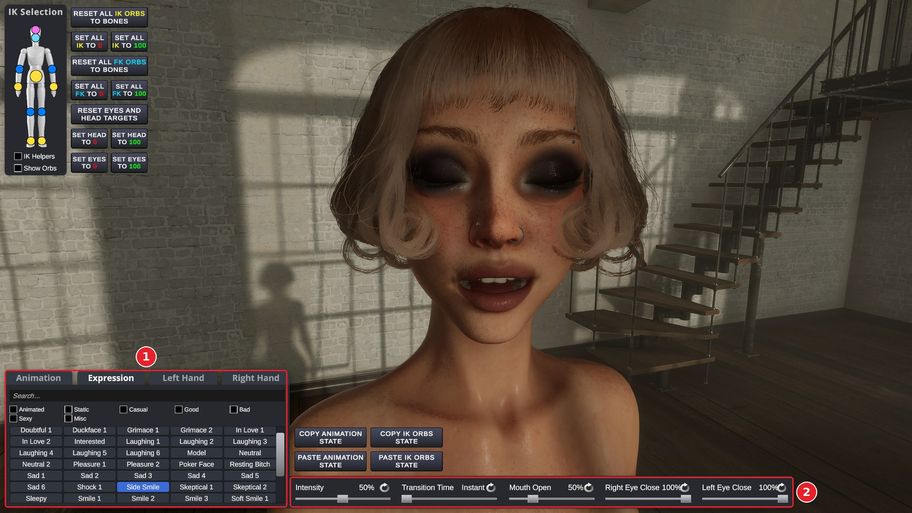
① Expression tab: click an expression to apply it. Search them by name, or tick the filters: Animated, Static, Casual, Good, Bad, Sexy, and Misc.
② Sliders that fine-tune the face:
- Intensity: how strong the expression should be applied (100% = fully).
- Transition Time: how long the face takes to change. Instant by default.
- Mouth Open, Right Eye Close and Left Eye Close: open the mouth or close the eyes, on top of the expression.
22. Attaching Entities
Objects can be attached to a bone of a character, so that they follow it everywhere (e.g., a ball in a hand).
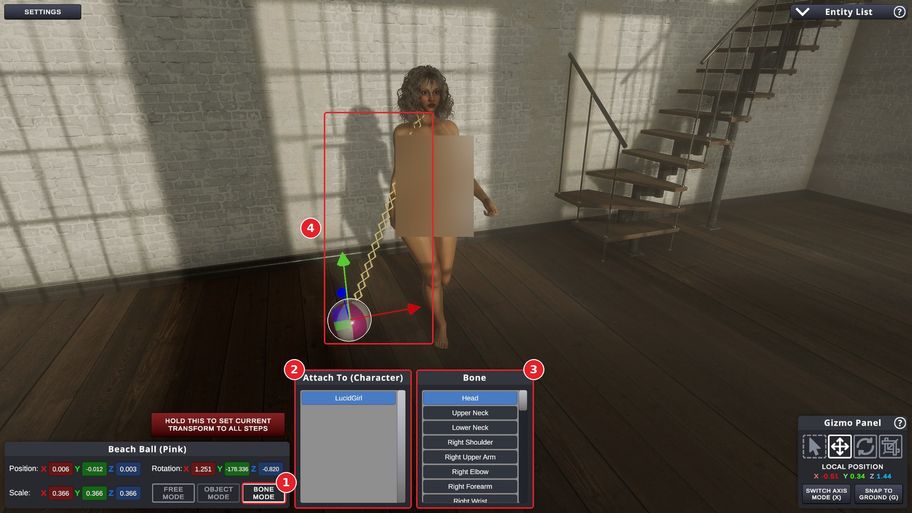
① Select the object, then click Bone Mode in its panel.
② Attach To (Character): choose the character.
③ Bone: choose the bone to which to attach.
④ A line links the object to its bone. Move and rotate the object to place it where you want, relative to the bone. While you place it, the character pauses and cancels its IK/FK; everything comes back when you deselect the object.
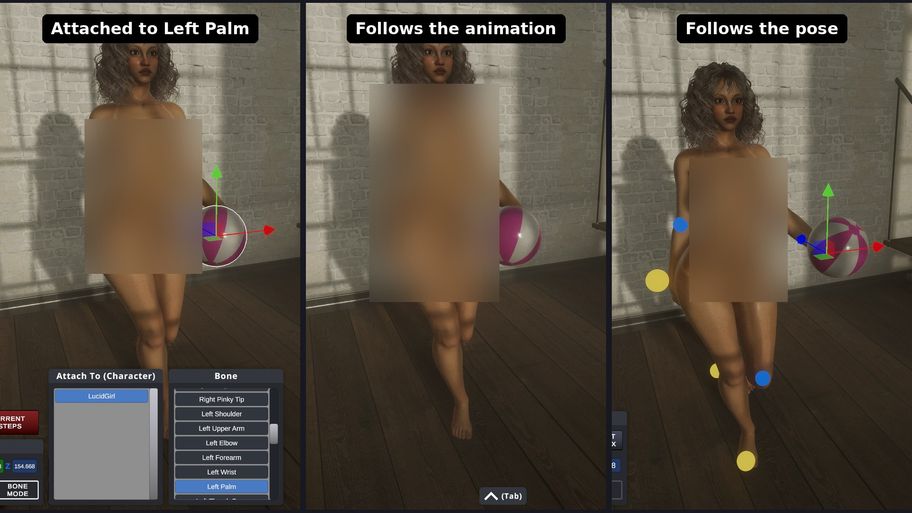
Once attached, the object follows its bone in every situation: here, the ball stays in the left palm when the animation plays, and when the left hand is posed with its orb.
In Object Mode, an entity is attached to another object instead, and follows it in the same way.
23. Flow Nodes
Flow nodes (purple) don't show anything by themselves. Placed between two Steps, they change the music, move the scene smoothly, switch environments, or make decisions.
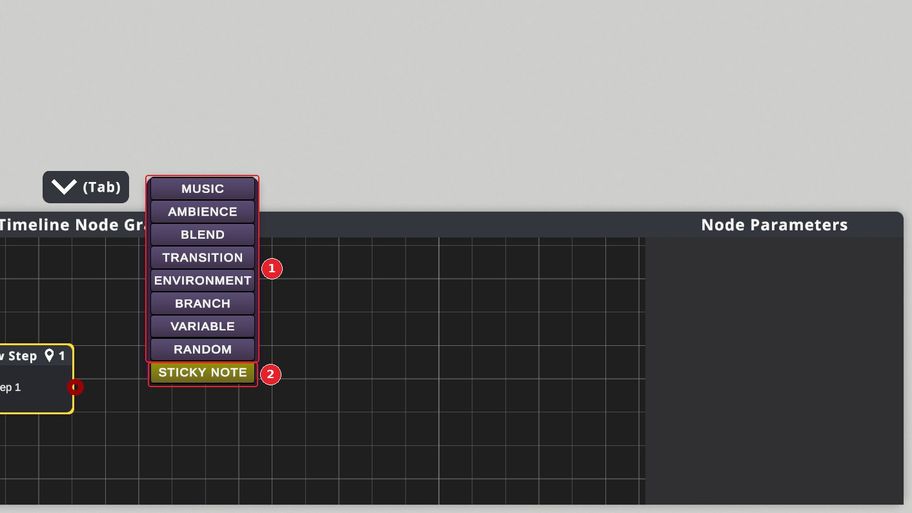
① Right-click on an empty part of the graph, then select the flow node to add. The Blend, Transition, and Environment nodes must absolutely be linked to a Step, they cannot lead to another flow node, other flow nodes can be freely linked in succession (for example, changing both the music and the background ambient sounds at the same time).
② Sticky Note adds a note (see 23.9).
23.1 Music
Controls the background music: change the track, the volume, or the play mode.
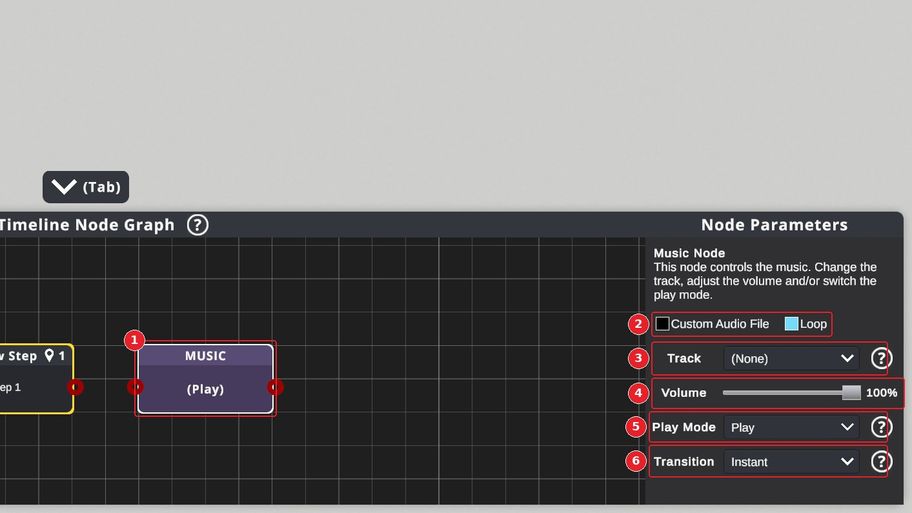
① The node shows its play mode.
② Custom Audio File: play your own music file instead of a built-in track. Loop: the music starts again when it ends.
③ Track: the music to play.
④ Volume.
⑤ Play Mode:
- Play: plays the chosen track (or resumes it after a pause).
- Start: restarts the track from the beginning.
- Pause: pauses the music. The next Play resumes it where it stopped.
- Stop: stops the music. The next Play starts it from the beginning.
⑥ Transition: Instant, Fast (2s), Smooth (4s) or Slow (6s). The new track fades in over this time, and Pause/Stop fades the music out.
Custom audio files can be WAV, OGG, or MP3, up to 256 MB.
23.2 Ambience
Controls the background ambience, a sound that always loops, such as rain or a crowd.
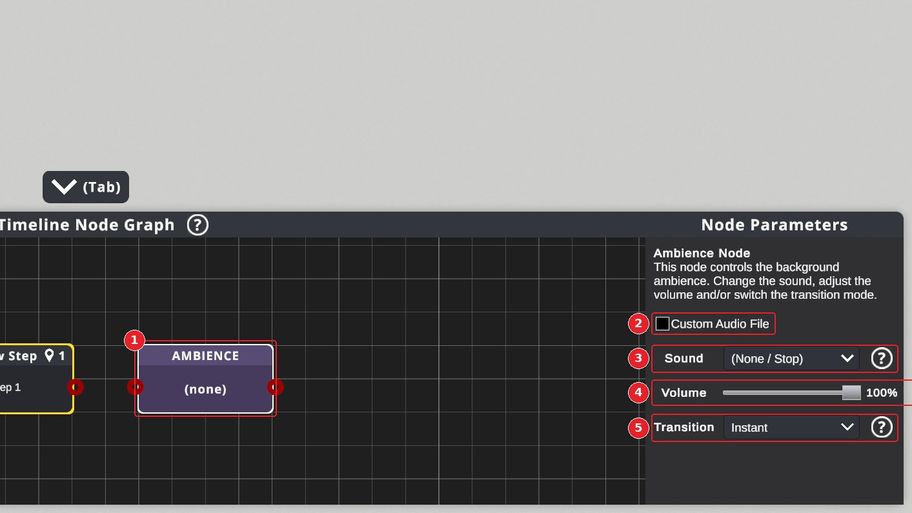
① The node shows the current sound.
② Custom Audio File: play your own sound file instead of a built-in ambience.
③ Sound: the ambience to play, or (None / Stop) to stop it.
④ Volume.
⑤ Transition: Instant, Fast (2s), Smooth (4s) or Slow (6s). When the sound changes, the old one fades out, then the new one fades in.
23.3 Blend
Moves the whole scene smoothly from the previous Step to the next one: camera, characters and their poses, objects, sun, clouds, camera effects and Step Values. Characters and objects only move when both Steps are in the same environment. Some things aren't compatible and will change at once: clothes and enabling/disabling clouds, for example. Use it to move the camera, make a character walk to a new spot, or let the light change slowly.
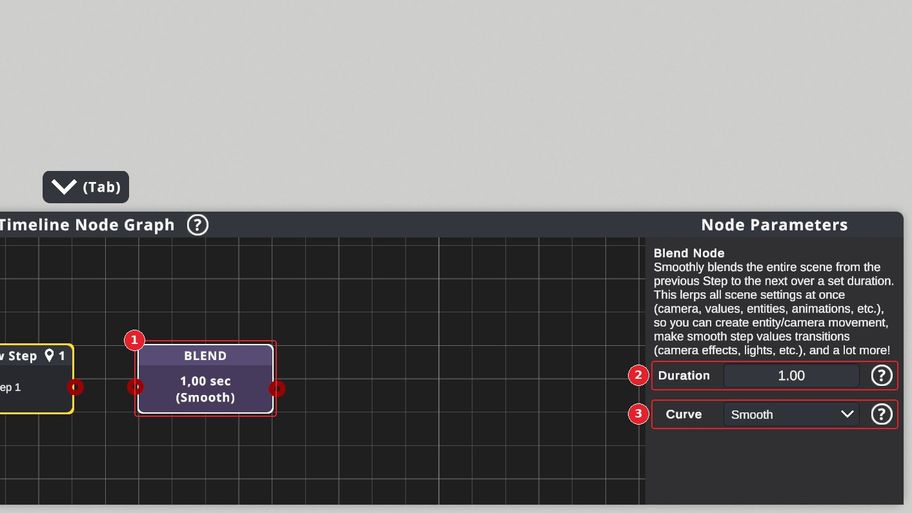
① The node shows its duration and its curve.
② Duration, in seconds.
③ Curve: Linear (constant speed), Smooth (starts and ends gently), Ease In (speeds up) or Ease Out (slows down).
Tip: a Blend leads to a Step, never to another flow node. To build a long camera move, chain Blends through very short View Steps (0.01 second), used as waypoints.
23.4 Transition
Adds a visual transition between two Steps of the same environment.
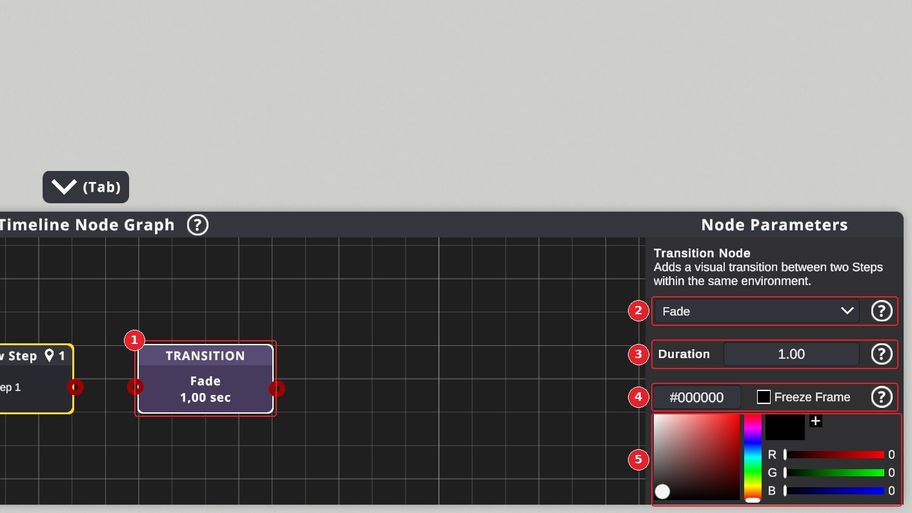
① The node shows the type and the duration of the transition.
② The type of transition dropdown, here Fade.
③ Duration: the whole transition, from 0.1 to 30 seconds. The effect covers the screen during the first half, the Step changes behind it, and the second half reveals the new Step.
④ The color of the transition, as a hexadecimal code. Freeze Frame uses the last image of the previous Step instead of a color: the image freezes, the new Step starts behind it, and the effect dissolves the frozen image to reveal the new Step. The node then shows (FF).
⑤ The color picker to easily select the hexadecimal code.
23.5 Environment
Loads another environment. It is required whenever two linked Steps take place in different environments. Link a Title Step to its input to show your own loading screen.
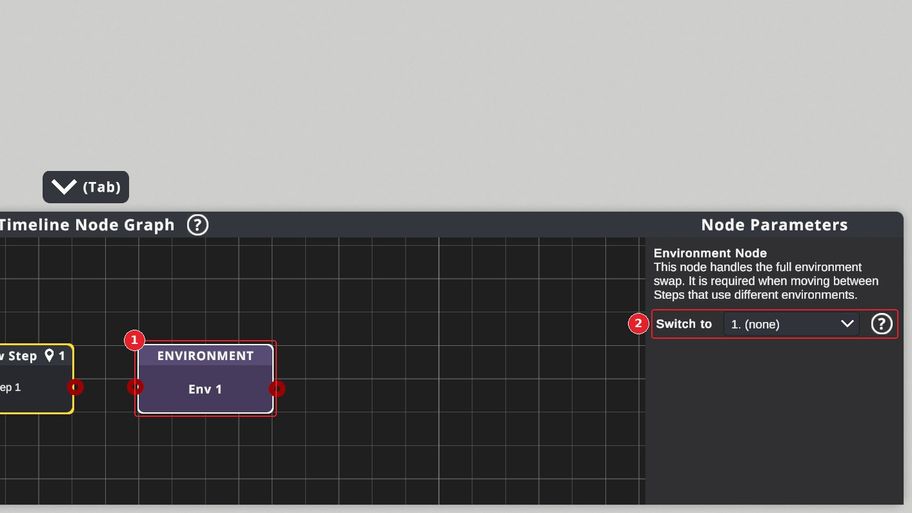
① The node shows the environment it loads.
② Switch to: the environment to load, by its ID (number) in the Environment Library.
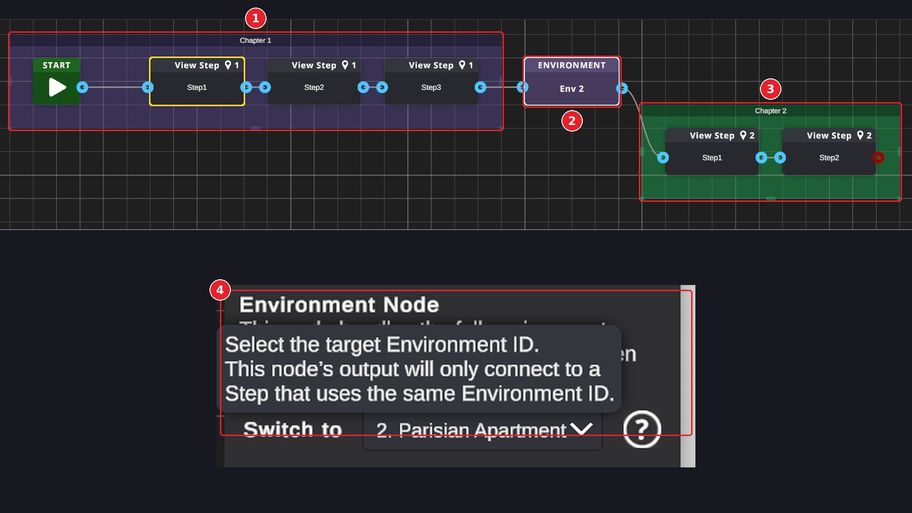
① The Steps of environment 1, with the pin and the number 1 in their header.
② The Environment node, set to environment 2. It can take any number of different environment IDs as input.
③ Its output only leads to Steps of environment 2. The zones "Chapter 1" and "Chapter 2" are only there to make the graph easier to read.
④ Switch to chooses the environment to switch to.
23.6 Branch
Reads a variable and continues through the output that matches its current value.
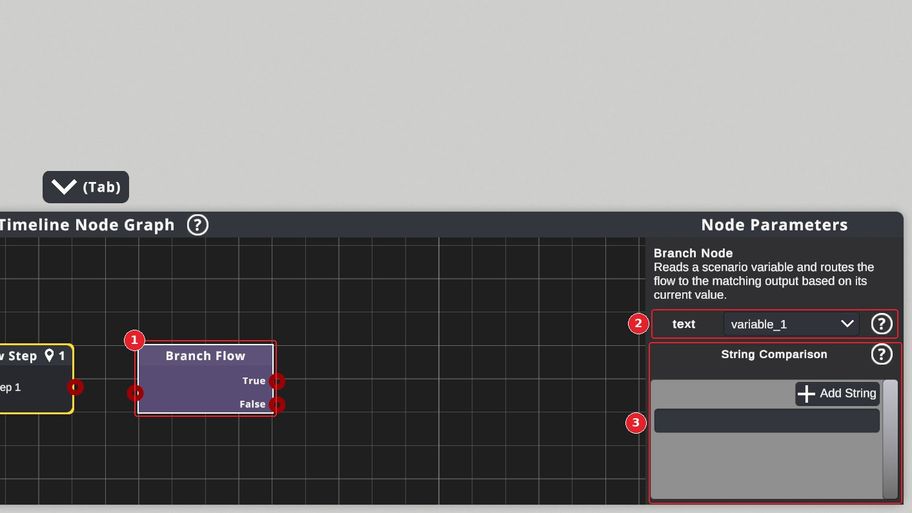
① The node has one output per possible result.
② The variable to read, from the Variable Library.
③ The outputs depend on the type of the variable:
- Flag: two outputs, True and False.
- Number: three outputs, <, = and >, comparing the variable with a reference value that you type.
- Text: one output per text, plus else. Add String adds a text to compare, and − removes the last one. The text must match exactly, capitals included. When nothing matches, the flow goes through else.
23.7 Variable
Changes the value of a variable.
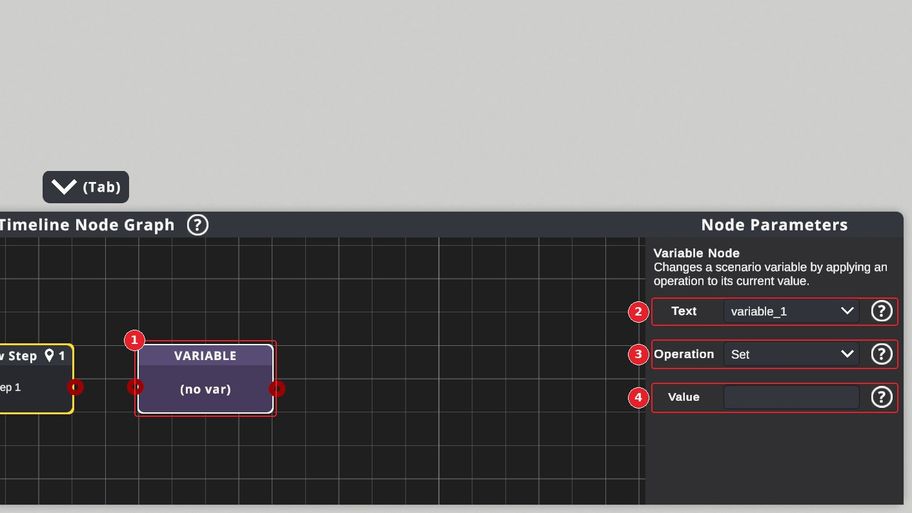
① The node shows the variable it changes.
② The variable to change.
③ Operation:
- For a Flag: Set On, Set Off, or Switch (on becomes off, and off becomes on).
- For a Text: Set (replaces the text) or Insert (adds the value at the end, with no space).
- For a Number: Set, Add or Subtract, with whole numbers.
④ Value: the value used by the operation.
23.8 Random
Continues through one of its two outputs, at random.
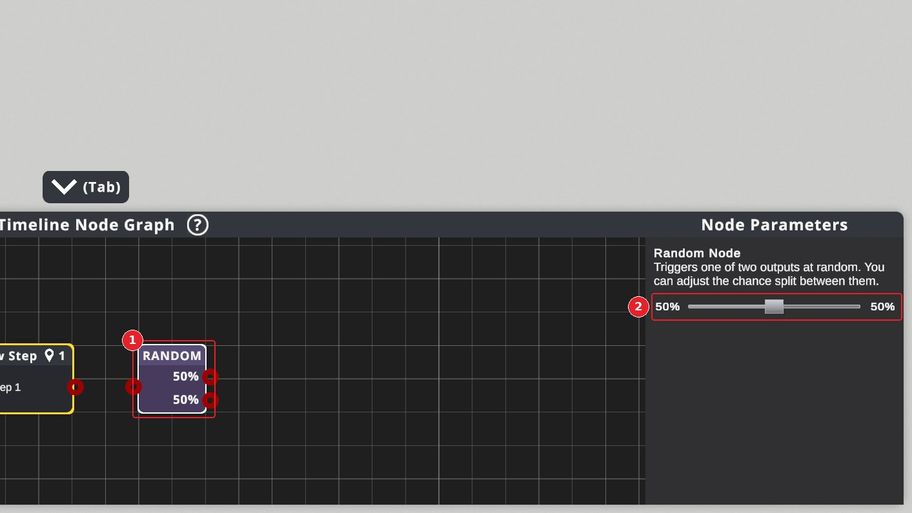
① The node shows the chance of each output.
② Drag the slider to change the chances, from 1% to 99% (50% each by default).
23.9 Sticky Note
A yellow note for your own comments. It changes nothing in the scenario, but is useful to make your project readable.
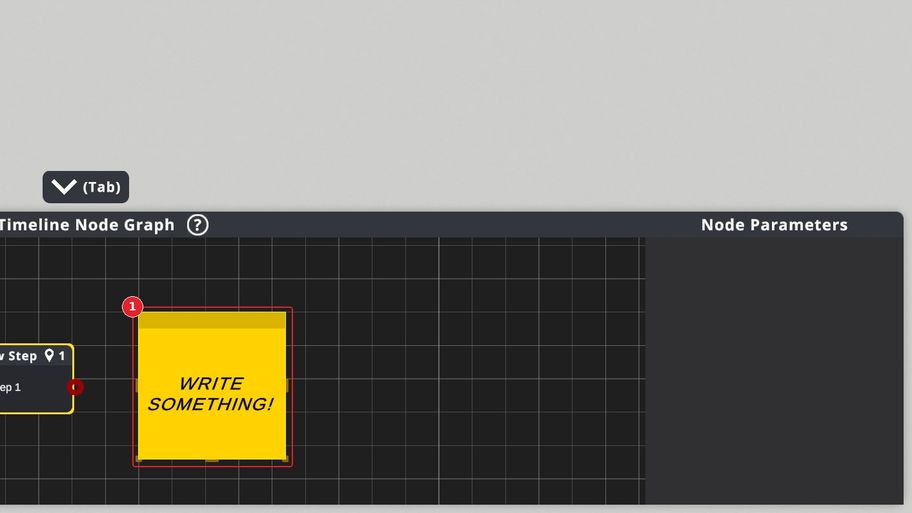
① Click the note to type in it, drag its top bar to move it, and drag its edges to resize it.
24. Lights
Besides the sun, you can light your scenes with point lights and spot lights, from the Other tab of the Entity Spawn Browser. The ones marked (Hard Shadow) cast shadows. A new light appears 1 meter in front of the scene camera and stays in the air. Its bulb icon only shows in the editor; the player only sees the light.
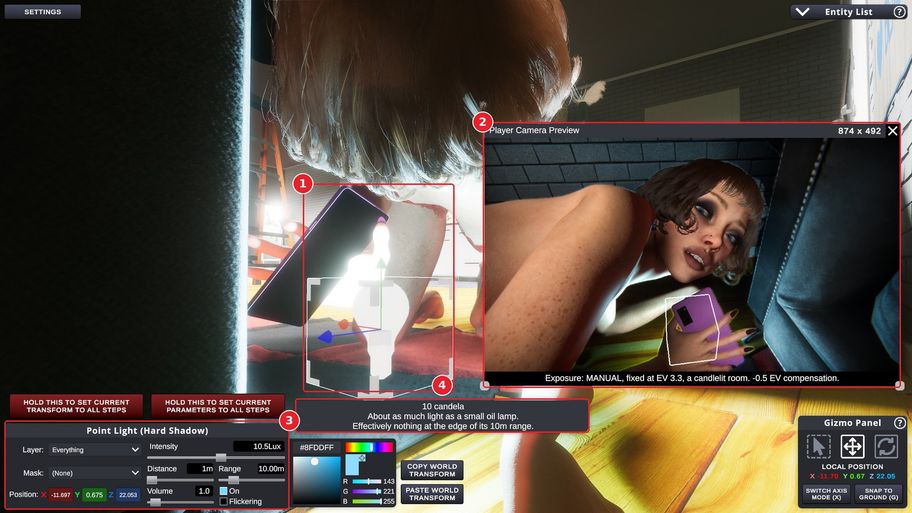
① A point light shines in every direction, like a bare bulb. Move it with the gizmo.
② Open the Player Camera Preview (P) to see the result as the player will.
③ The light panel. See 24.1.
④ The read-out describes the strength of the light in plain words: here, 10 candela, "about as much light as a small oil lamp", and what is left of it at the edge of its range.
Tip: judge your lights with a manual exposure, in the Camera Settings. With an automatic exposure, the camera compensates for your changes and hides them.
The Light Panel
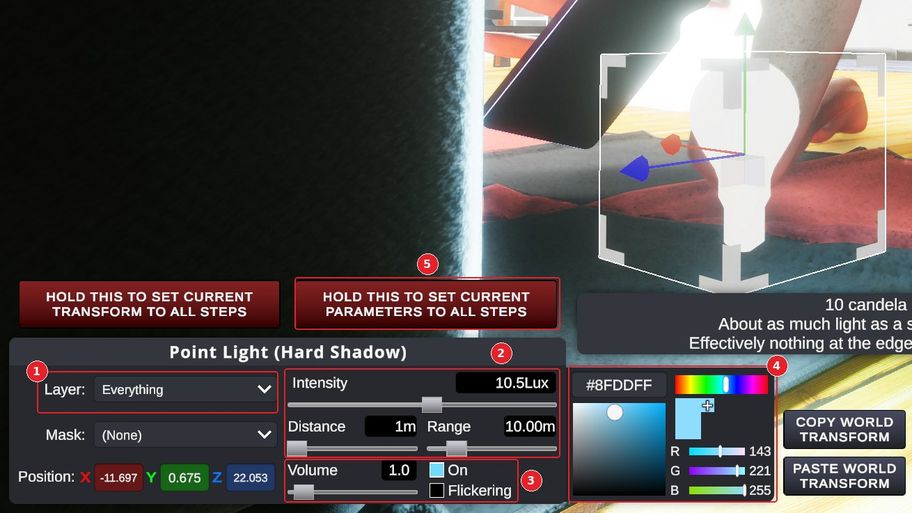
① Layer: the surfaces the light touches. Everything lights the whole scene. The other choices light only one kind of surface, such as the scenery, the furniture, the characters, or their hair: use them to add a rim light to a character without lighting the wall behind for example.
② Intensity, in lux, from 0.01 to 4,000. Distance is the distance at which this intensity is measured, from 1 to 50 m: the same number of lux measured farther away makes a much stronger light. Range is how far the light reaches, in meters.
③ Volume: how much the light shows in the air, as light shafts or a halo in fog, from 0 to 16 (1 by default). On switches the light on or off, and Flickering makes it flicker like a faulty bulb.
④ The color of the light.
⑤ On and Flickering belong to the current Step: all the other settings stay the same in every Step. Hold this to set current parameters to all Steps copies the On and Flickering of this Step to every Step of the current environment. Hold it for 3 seconds: it cannot be undone. The button next to it does the same for the position and the rotation (see 7.3).
Lamps, in the Furniture tab, give light too. Their panel has simpler light settings: color, intensity, range, volume, On/Off, and Flickering.
Spot Lights
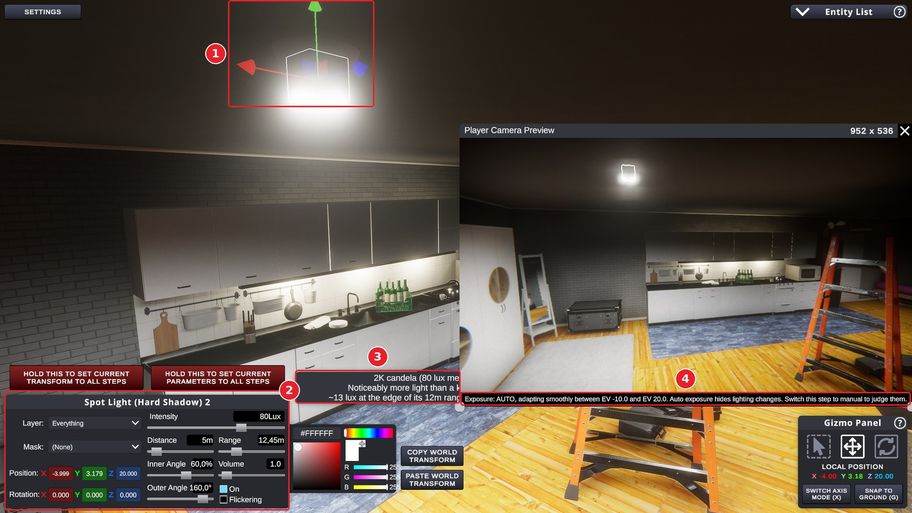
① A spot light shines in a cone, like a ceiling spot or a flashlight. Turn it with the gizmo to aim it.
② Its panel has the settings of the point light, plus:
- Rotation, to aim the light precisely.
- Outer Angle: the width of the cone, in degrees.
- Inner Angle: the part of the cone lit at full strength, as a percentage of the cone. The light fades out between the inner part and the edge of the cone.
③ With a Distance of 5 meters, the read-out shows the intensity at that distance: "2K candela (80 lux measured at 5m)".
④ Here, the Player Camera uses automatic exposure, and the preview warns you that it hides lighting changes.
No posts found.