Lucid Girl Creator: Complete Guide
This guide is a work in progress: new sections are added regularly.
Character Creators allow you to customize your characters down to the smallest detail. From basic appearance options like skin color or facial features, to advanced parameters such as bone scaling or voice customization, every aspect of your character can be fine-tuned.
This tutorial will guide you step by step through every option, category, and menu of the Lucid Girl Creator. Each section will be illustrated with annotated screenshots to ensure nothing is missed, whether you are creating a character quickly or aiming for maximum precision.
Quick Navigation
- Overview
- Categories
- 2. Skin
- 3. Body
- 3.1 Body Shapes
- 3.2 Body Type Presets
- 3.3 Global Scale
- 3.4 Fine-Tuning Sliders
- 3.5 Navel Types
- 3.6 Bone Scaling
- 4. Head
- 4.1 Head Shapes
- 4.2 Piercing Location Tabs
- 4.3 Piercing System
- 4.4 Ethnicity Shapes
- 4.5 Piercing Visual Selection
- 5. Eyes
- 6. Ears
- 7. Nose
- 8. Mouth
- 8.1 Mouth Shapes
- 8.2 Main Tabs
- 8.3 Piercing Location Tabs
- 8.4 Visual Menu
- 8.5 Color Section
- 8.6 Piercing Visual Selection
- 9. Breasts
- 9.1 Breasts Shapes
- 9.2 Main Tabs
- 9.3 Piercing Location Tabs
- 9.4 Visual Menu
- 9.5 Nipples Filter
- 9.6 Nipples & Physics Sliders
- 10. Bottom
- 10.1 Bottom Shapes
- 10.2 Main Tabs
- 10.3 Piercing Location Tabs
- 10.4 Visual Menu
- 10.5 Color Section
- 10.6 Pussy Shapes
- 11. Makeup
- 12. Haircut
- 12.1 Main Tabs
- 12.2 Position Sliders
- 12.3 Visual Menu
- 12.4 Global Controls
- 12.5 Hair Trimming
- 12.6 Color Section
- 12.7 Sliders
- 13. Pilosity
- 14. Tattoos
- 15. Randomizer
- 16. Reference
- 17. Save / Load
- Systems
1. Global Interface
The following screenshot shows what you see when entering the Character Creator for the first time.
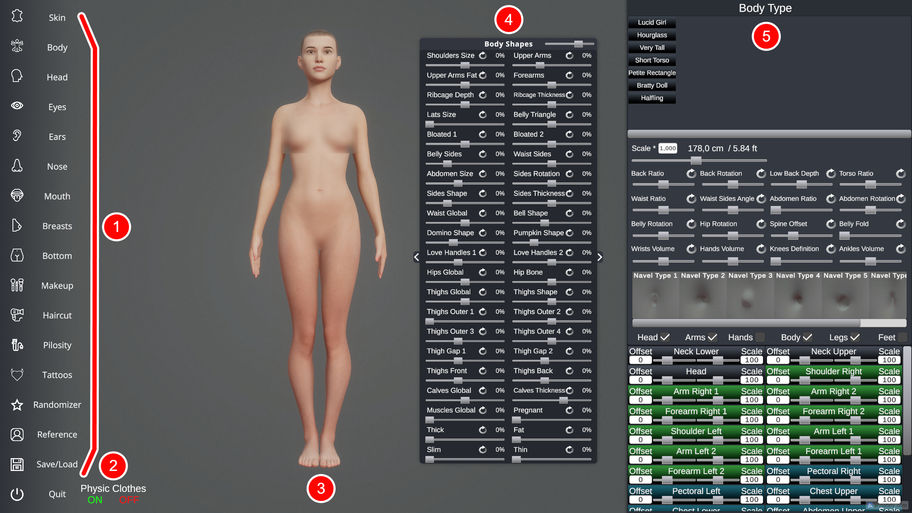
This is the default layout, and it will remain largely consistent throughout the customization process, with some elements changing depending on the selected category.
Below is a detailed explanation of each numbered annotation.
① Sidebar Menu
The Sidebar Menu is hidden by default and becomes visible when you hover your cursor over the left edge of the screen. The Sidebar Menu is the main navigation element of Character Creators. It contains 17 buttons, most of which correspond to a different customization category that will be explained in detail later in this tutorial.
② Bottom-Left Toggles
Located in the bottom-left corner of the screen, these toggles control various preview options. The number of available toggles may vary depending on the game version. In this example, they allow you to enable or disable real-time body physics and default clothing for preview purposes, while the sun slider next to them sets the intensity of the sunlight.
③ Character
This is the default 3D character model. All customizations are applied directly to this model, ranging from basic changes, such as skin color or facial features, to advanced modifications like bone scaling or voice customization.
④ Movable Window
The Movable Window contains sliders and controls related to the currently selected category. It can be freely moved to avoid obstructing the character view, and resized with the slider next to its title. A single Movable Window is shared by all categories, so its size is kept for the whole session.
Slider values can be pushed beyond their recommended limits using the Custom Value Drawers, opened with the white arrows on the left and right sides of the window. Each slider gets an input box where any value, positive or negative, can be entered: these limitless values let you go far beyond what the sliders allow, at the risk of extreme or broken shapes.
In some categories, presets are also available in a bottom drawer, providing a fast starting point for your character.
Two other draggable windows, the Randomizer and the Reference, can be opened on top of any category.
⑤ Side Window
Located on the right side of the screen, the Side Window displays the main visual menus of the selected category. Depending on the category, this may include visual elements such as hairstyles, tattoos, body hair, piercings, or other appearance-related options.
All the options of the Side Window are designed to fit on a single screen, without scrolling: only the list of tabs at the top right can scroll when it is long.
Keyboard Shortcuts
Two keyboard shortcuts are available anywhere in the Character Creator:
- F1 enters photo mode, with a free camera, which is perfect for taking screenshots.
- L switches between the available lighting modes.
2. Skin
The Skin category controls both the physical and visual aspects of the character’s skin.
It combines detailed 3D skin shaping with advanced 2D textures, colors, and layered details, allowing precise control over aging, surface properties, and visual appearance.
The following screenshot shows the Skin category interface and its main components.
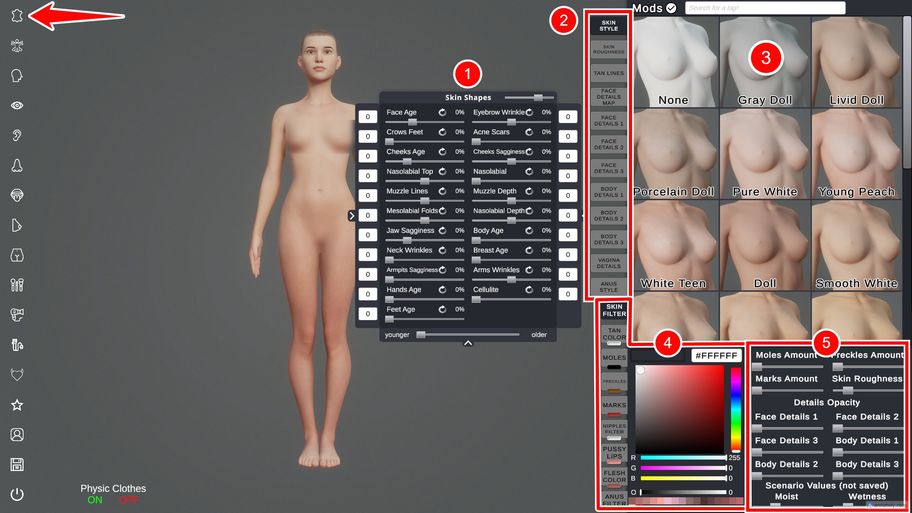
① Skin Shapes (Movable Window)
The Movable Window contains all 3D skin-related parameters, and like all sliders in the Movable Window, their values can be pushed beyond their limits using the Custom Value Drawers (opened with the white arrows).
In the bottom drawer, the global younger ↔ older slider applies a preset-based interpolation between a young and an old 3D skin profile. Using this slider overwrites all current Skin Shapes values and should be used with caution once manual adjustments have been made.
② Main Tabs (Side Window)
The Side Window contains all 2D skin settings, organized into vertical tabs.
Each tab provides access to textures, visual styles, or detail maps related to the skin.
③ Visual Menu
The Visual Menu displays the visual options of the currently selected tab in the Side Window. Depending on the active tab, this area is used to select visual elements such as skin styles, skin roughness patterns, tan lines, detail maps, or other skin-related textures.
At the top of the Visual Menu, a Mods toggle allows you to enable or disable the display of modded content.
A search bar is also available, allowing you to filter options by name or by tag for faster access.
Selections made in this menu directly affect the character’s skin appearance and are combined with color layers and sliders to produce the final skin result.
④ Color Section
The Skin category features a full color picker system, including RGB sliders and direct hexadecimal input. Colors can be copied, pasted, and saved as presets for the current session, allowing fast reuse and experimentation across different parameters.
Each color tab provides access to color layers related to the skin. The color associated with each tab is displayed directly beneath its name, allowing quick identification and selection among the multiple skin-related colors available in this category.
⑤ Sliders (Side Window)
The Side Window includes multiple sliders used to control opacity and intensity values for skin details.
A. The first three sliders: Freckles Amount, Moles Amount, and Marks Amount control the strength of the Face Detail Map.
B. The fourth slider, Skin Roughness, sets the strength of the Skin Roughness texture.
C. All sliders in between are opacity sliders, used to blend skin detail textures.
D. The last two sliders: Moist and Wetness, are Scenario Values used exclusively for preview purposes. These values are not saved and are intended to simulate skin conditions during scenarios, such as sweat.
3. Body
The Body category controls the whole silhouette of the character, from global proportions to the size of each bone.
It combines 3D body shapes, body type presets, a global height scale, and a complete bone scaling system, allowing anything from subtle adjustments to extreme fantasy proportions.
The following screenshot shows the Body category interface and its main components.

① Body Shapes (Movable Window)
The Movable Window contains more than forty sliders shaping the body:
- Upper body: shoulders, upper arms and forearms, ribcage, and lats.
- Belly and waist: several belly shapes, such as Belly Triangle, Bloated, Bell Shape, Domino Shape, or Pumpkin Shape, along with the sides, the abdomen, the waist, and the love handles.
- Hips and legs: hips, hip bone, thighs, thigh gap, and calves.
- Global morphs: Muscles Global, Pregnant, Thick, Fat, Slim, and Thin, which affect the whole body at once.
As with all Movable Windows, slider values can be pushed beyond their limits using the Custom Value Drawers (opened with the white arrows).
② Body Type Presets (Side Window)
At the top of the Side Window, Body Type presets such as Lucid Girl, Hourglass, Very Tall, Petite Rectangle, or Halfling provide a fast starting point for the silhouette.
Selecting a preset overwrites the sliders and bones of the Side Window, but never touches the Body Shapes of the Movable Window.
③ Global Scale
The Scale slider sets the global size of the character, 1 being the default size. The resulting height is displayed next to it, in both centimeters and feet, and the input box allows precise values to be entered.
The global scale adds up with bone scaling: lengthening the legs, for example, also increases the displayed height.
④ Fine-Tuning Sliders
Below the Scale, 16 sliders refine specific parts of the body, such as the ratios and rotations of the back, torso, waist, abdomen, belly, and hips, the Spine Offset, the Belly Fold, or the volume of the wrists, hands, knees, and ankles.
Unlike the Movable Window, these shapes are firmly limited to a minimum and a maximum: they control precise details, such as the orientation of the spine, which would break beyond their range. They are also overwritten by Body Type presets.
⑤ Navel Types
The Navel Types are 3D shape presets for the belly button, which can be browsed with the scrollbar below them. Like the nipple shapes, they change the 3D shape itself, not a texture.
⑥ Bone Scaling
The last section gives access to every bone of the character. Each bone has two sliders, each with its own input box:
- Offset moves the bone along its chain, making that part of the body longer or shorter: for example, increasing the offset of the leg bones lengthens the legs.
- Scale resizes the bone uniformly on all three axes, making it thicker or thinner, 100 being its default size.
Combined, these two settings let you lengthen, shorten, and refine the proportions of each part of the body, independently on the left and right sides.
The Head, Arms, Hands, Body, Legs, and Feet toggles show or hide the bones of each group, making the list easier to browse.
Good to know: scaling a bone also scales every bone that follows it in the chain. For example, increasing the scale of a thigh to 200% also enlarges the calf and the foot, so the following bone must be scaled down to change only the thigh.
The feet are automatically kept on the ground, even with asymmetrical legs: the longest leg always has its foot placed perfectly on the ground.
4. Head
The Head category focuses on the character’s facial structure and proportions, as well as head-related elements such as piercings.
It allows precise control over the overall shape of the face through 3D morphing, while also providing visual tools to manage piercing placement and selection.
The following screenshot shows the Head category interface and its main components.
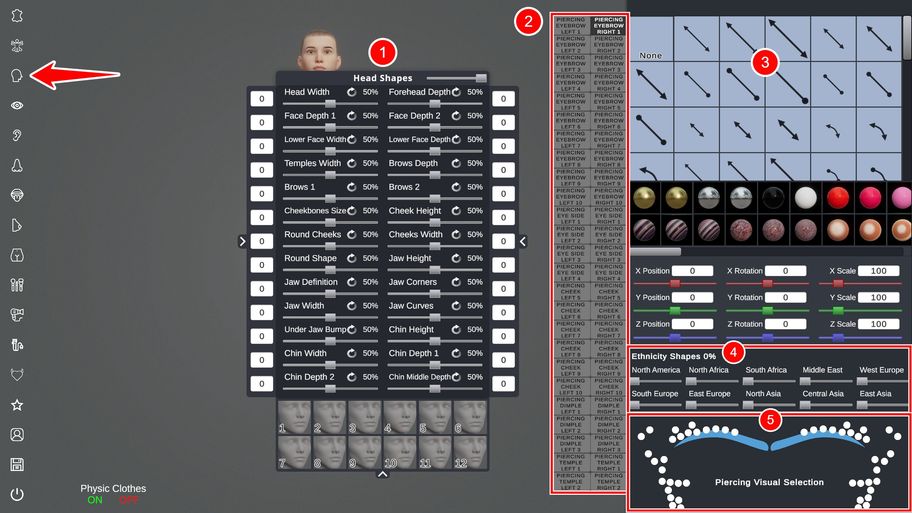
① Head Shapes (Movable Window)
The Movable Window contains all 3D head and face shape parameters. These sliders control the proportions, depth, width, and definition of the head and facial features.
As with all Movable Windows, slider values can be pushed beyond their limits using the Custom Value Drawers (opened with the white arrows).
In the bottom drawer, a set of 12 presets is available. Selecting a preset applies predefined values to all Head Shapes sliders, providing a fast starting point for facial customization.
② Piercing Location Tabs (Side Window)
These tabs are used to select the piercing location currently being edited.
Each tab corresponds to a specific area of the head, and each location can have a different piercing configuration applied independently.
Switching tabs changes the active piercing slot without affecting other piercing locations.
③ Piercing System
This section provides access to the piercing system, allowing selection, transformation, and customization of piercings for the active location.
Because this system is shared across multiple categories, it is covered in detail in the Piercing System chapter.
④ Ethnicity Shapes
Ethnicity Shapes are used to define the base facial morphology of the character's face.
Each slider contributes to a global ethnicity blend, which is limited to a total of 200%. For example, multiple sliders can be combined (e.g. 75% + 75% + 50%), but once the limit is reached, no additional values can be added.
For best results and to avoid deformation issues, it is recommended to keep the global ethnicity value below 100%.
⑤ Piercing Visual Selection
The Piercing Visual Selection provides a visual representation of all piercing locations on the head.
Each white dot represents a piercing slot and can be clicked to directly select the corresponding location.
This visual method offers a faster and more readable alternative to the Piercing Location Tabs, especially when managing multiple piercings.
5. Eyes
The Eyes category controls both the 3D shape of the eyes and all visual aspects related to irises, eyeballs, and eye textures.
The following screenshot shows the Eyes category interface and its main components.
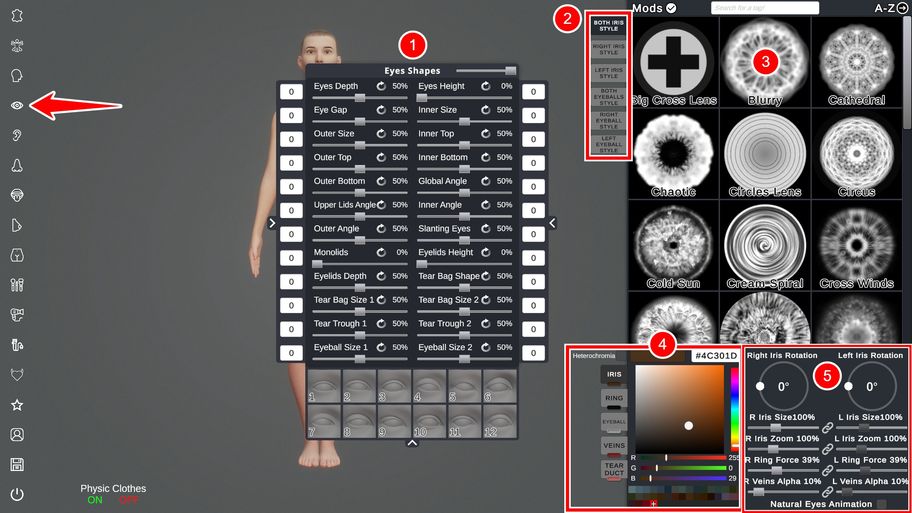
① Eyes Shapes (Movable Window)
The Movable Window contains all 3D eye shape parameters. These sliders control the overall structure of the eyes, including depth, size, spacing, angles, eyelids, and tear bag shapes.
As with other Movable Windows, slider values can be pushed beyond their limits using the Custom Value Drawers (opened with the white arrows).
At the bottom of the window, a set of 12 eye shape presets is available. Selecting a preset automatically updates all Eyes Shapes sliders, providing a fast way to establish a base eye morphology before applying manual refinements.
② Main Tabs (Side Window)
The Side Window contains tabs used to define which eye elements are currently being edited.
These tabs allow you to switch between Iris and Eyeball settings, and to choose whether changes apply to the Left Eye, Right Eye, or Both Eyes simultaneously.
This structure enables native texture heterochromia, allowing each eye to use different visual styles, textures, and colors when required.
③ Visual Menu
The Visual Menu displays the visual options available for the currently selected eye tab. Depending on the active selection, this area is used to choose iris textures, eyeball textures, or other eye-related visual assets.
At the top of the Visual Menu, a Mods toggle allows you to enable or disable the display of modded content.
A search bar is also available, allowing you to filter visual options by name or by tag.
Additionally, a sorting control lets you organize the displayed options in alphabetical order, either ascending or descending, for easier browsing.
④ Color Section
The Eyes category includes a full color picker system for eye-related colors.
By default, four color channels can be edited: Iris, Ring, Eyeball, and Veins, along with the color of the Tear Duct.
When the Heterochromia toggle is enabled, color editing is split per eye. This expands the system from four to eight editable colors, allowing independent control of Iris, Ring, Eyeball, and Veins colors for both the left and right eyes. As always, all colors support RGB sliders and hexadecimal input, enabling precise color matching and reuse.
⑤ Sliders (Side Window)
This section contains advanced controls for eye texture behavior and animation.
Two radial sliders allow independent rotation of the left and right irises, each ranging from 0° to 360°, enabling precise orientation of iris textures.
Four additional sliders control various texture-related properties of the eyes. When the chain toggle icon between paired sliders is enabled, the right slider automatically follows the value of the left slider, maintaining symmetry between both eyes. Disabling the chain allows independent adjustment.
A Natural Eyes Animation toggle is also available. When enabled, the character’s eye animation AI is active, allowing natural eye movements such as looking around, occasionally focusing on the camera, and exhibiting subtle saccadic motion when the character is rotated.
When disabled, the eyes remain fixed. This option is intended for preview purposes only and does not affect saved data. The same toggle is also available in the Save / Load menu and is provided here for quick access while working on the eyes.
6. Ears
The Ears category controls the shape of the character's ears, as well as ear piercings.
It combines a few 3D shape sliders, including fantasy options such as pointy or elf ears, with the shared Piercing System.
The following screenshot shows the Ears category interface and its main components.

① Ears Shapes (Movable Window)
The Movable Window contains six sliders controlling the 3D shape of the ears: Ears Size, Ears Angle, Ears Height, Pointy Ears, Fantasy Ears, and Elf Ears.
The last three sliders give the ears a non-human shape, and can be combined to create elves, goblins, or other fantasy characters.
As with all Movable Windows, slider values can be pushed beyond their limits using the Custom Value Drawers (opened with the white arrows).
② Piercing Location Tabs (Side Window)
The Side Window lists 52 piercing slots: 26 for the left ear, and 26 for the right ear.
Each slot can hold its own piercing, configured independently from all the others.
③ Piercing System
This section is used to choose, place, and customize the piercing of the active slot.
Because this system is shared across multiple categories, it is covered in detail in the Piercing System chapter.
④ Piercing Visual Selection
The Piercing Visual Selection shows both ears, where each white dot represents a piercing slot.
Clicking a dot directly selects the corresponding slot, which is much faster than browsing through the 52 tabs.
7. Nose
The Nose category controls the detailed 3D shape of the nose, from the bridge to the nostrils, as well as nose piercings.
The following screenshot shows the Nose category interface and its main components.

① Nose Shapes (Movable Window)
The Movable Window contains more than thirty sliders, grouped by area of the nose:
- Global shape: depth, height, width, top width, and two angle sliders.
- Bridge: depth, height, two scale sliders, slope, curve, and definition, plus two Nose Bump sliders.
- Tip: depth, height, width, roundness, and two definition sliders, plus Potato for a rounder, bulbous tip.
- Bottom and nostrils: bottom scale, sides, and width, nostril width, size, angle, and height, and the height and width of the septum.
As with all Movable Windows, slider values can be pushed beyond their limits using the Custom Value Drawers (opened with the white arrows).
In the bottom drawer, a set of 12 presets is available. Selecting a preset applies predefined values to all Nose Shapes sliders, providing a fast starting point for nose customization.
② Piercing Location Tabs (Side Window)
The Side Window lists 21 piercing slots: six on each side of the nose, three Septum slots, two High Nostril slots, two Bridge slots, and the Austin Bar and Nasallang placements.
The Hide Piercing Goal button at the top hides the blue orb marking where the active piercing is attached, so you can shape the nose without it getting in the way. See the Piercing System chapter for more details.
③ Piercing System
This section is used to choose, place, and customize the piercing of the active slot. It is covered in detail in the Piercing System chapter.
④ Piercing Visual Selection
The Piercing Visual Selection shows the nose from three angles: Nose Left, Nose Middle, and Nose Right.
Each white dot represents a piercing slot and can be clicked to select it directly.
8. Mouth
The Mouth category controls the shape of the lips and mouth, the teeth, the tongue, and the gums, as well as mouth piercings.
The following screenshot shows the Mouth category interface and its main components.

① Mouth Shapes (Movable Window)
The Movable Window contains more than twenty sliders shaping the lips and mouth:
- Global: size, thickness, and width of the whole mouth.
- Lips: size and thickness of the upper and lower lips, lower lip width and height, upper curves, middle height, and Upper Middle Up.
- Corners: width, height, and thickness of the corners, and the Commissures Angle.
- Details: Tubercle Height, Cupid's Bow, and the definition and width of the philtrum.
- Global shapes: Square Shape and Heart Shape, which reshape the lips as a whole.
As with all Movable Windows, slider values can be pushed beyond their limits using the Custom Value Drawers (opened with the white arrows).
In the bottom drawer, a set of 12 presets is available. Selecting a preset applies predefined values to all Mouth Shapes sliders, providing a fast starting point for lip customization.
② Main Tabs (Side Window)
The Teeth and Tongue tabs at the top of the Side Window select which part of the mouth is displayed in the Visual Menu.
③ Piercing Location Tabs
Below the main tabs, 38 piercing slots cover the lips and the chin: upper, middle, bottom, and under the lips, High slots above the corners, three Chin slots, and a Smiley piercing inside the mouth.
Selecting a piercing slot replaces the Visual Menu with the Piercing System, used to choose, place, and customize the piercing.
④ Visual Menu
The Visual Menu displays the styles available for the active tab.
With the Teeth tab, it offers many dental styles, from Straight teeth to several diastema variations, Vegan, and fang options such as Small Fangs, Medium Fangs, Big Fangs, and Vampire. With the Tongue tab, it displays the available tongue styles.
At the top of the menu, a Mods toggle enables or disables modded content, and a sorting control organizes the styles alphabetically.
⑤ Color Section
Three color tabs are available: Teeth, Tongue, and Gums.
Each uses the full color picker, with RGB sliders and hexadecimal input, see the Color System chapter.
⑥ Piercing Visual Selection
The Piercing Visual Selection shows the lips, where each white dot represents a piercing slot that can be clicked to select it directly.
Below it, the Open Mouth slider opens the character's mouth, making it easier to see the teeth, the tongue, their colors, and inner piercings. This slider is for preview purposes only: the same slider is available in the Save / Load menu to set up the presentation of your character's card.
9. Breasts
The Breasts category controls the shape and physics of the breasts, the look of the nipples, and nipple piercings.
The following screenshot shows the Breasts category interface and its main components.

① Breasts Shapes (Movable Window)
The Movable Window contains a Flat Chest toggle and eight sliders: Breasts Size, Shape, Weight, Implants, Gap, Firmness, Slope, and Curve.
When Flat Chest is enabled, the breasts are removed entirely and replaced by a flat, pectoral-like chest: all breast sliders and input boxes are grayed out.
The Breasts Implants slider gives the breasts a rounder, more artificial shape, and Breasts Firmness here is a pure shape parameter, not to be confused with the physics slider of the same name described below.
As with all Movable Windows, slider values can be pushed beyond their limits using the Custom Value Drawer (opened with the white arrow).
② Main Tabs (Side Window)
The two tabs at the top of the Side Window select what is displayed in the Visual Menu:
- Nipples Shape offers presets for the 3D shape of the nipples. The first option, marked with a cross, removes all 3D volume from the nipples.
- Nipples Style offers the nipple textures.
Combining Flat Chest with the cross option of Nipples Shape gives a completely flat chest.
③ Piercing Location Tabs
Ten piercing slots are available, five per nipple: Top, Bottom, Left, Right, and Center.
Selecting a slot opens the Piercing System, used to choose, place, and customize the piercing.
④ Visual Menu
The Visual Menu displays the options of the active tab: 3D nipple shapes with Nipples Shape, or nipple textures with Nipples Style, in many colors, sizes, and shapes, including a heart-shaped one.
A Mods toggle at the top enables or disables modded content.
⑤ Nipples Filter
The Nipples Filter applies a color over the selected nipple texture.
It uses the full color picker, with an additional O (opacity) slider controlling how strongly the color tints the texture, see the Color System chapter.
⑥ Nipples & Physics Sliders
A. Nipples Size sets the size of the nipples in three steps.
B. Two radial sliders, Right Nipple Rotation and Left Nipple Rotation, rotate each nipple texture independently.
C. Breast Gravity and Jelly Physics control how strongly the breasts are pulled down and how much they bounce when the body moves.
D. Breast Firmness decides how much the two sliders above can affect the breasts: at 100%, the breasts are as rigid as stone; at 0%, gravity and jelly physics have their full effect.
These physics settings only apply when body physics is enabled, see the Bottom-Left Toggles.
10. Bottom
The Bottom category controls the shape of the hips and butt, the intimate anatomy, and navel and intimate piercings.
The following screenshot shows the Bottom category interface and its main components.

① Bottom Shapes (Movable Window)
The Movable Window contains more than twenty sliders shaping the hips and butt:
- Global shape: height, depth, two side sizes, two hiplines, and two vertical spreads.
- Butt: top height, two bottom heights, corners height, Butt Top, Butt Global, Plump Butt, Gluteal Fold, and Petite Ass.
- Volume and firmness: Bottom Firmness, Saddlebags, Expand, Inflate, Cement Injection, Vertical Fat, and Muscle Tone.
As with all Movable Windows, slider values can be pushed beyond their limits using the Custom Value Drawers (opened with the white arrows). For example, entering 999 in the input box of a slider pushes its shape far beyond its maximum.
② Main Tabs (Side Window)
Four tabs at the top of the Side Window select what is displayed in the Visual Menu: Minora Shape, Majora Shape, Anus Style, and Vagina Details.
③ Piercing Location Tabs
34 piercing slots cover the navel and the intimate area: three navel slots, surface and hood placements, clitoris and labia slots on each side, and the Albertina, Triangle, Bottom High, and Bottom Low placements.
Selecting a slot opens the Piercing System, used to choose, place, and customize the piercing.
④ Visual Menu
The Visual Menu displays the options of the active tab. For example, the Majora Shape tab offers presets such as Full Outie, Balanced, Petal Kiss, or Labial Puff.
The Vagina Details tab contains a white map with varying opacity, which decides where the Pussy Lips color is applied. It can also be used directly as a colored map, for a more photorealistic but less customizable result. Like most textures in the game, it is fully compatible with mods, so you can create your own.
At the top of the menu, a Mods toggle enables or disables modded content, and a search bar filters styles by name or tag.
⑤ Color Section
Three color tabs are available: Pussy Lips, Flesh Color, and Anus Filter.
Each uses the full color picker, with an additional O (opacity) slider, see the Color System chapter.
⑥ Pussy Shapes
These sliders refine the intimate anatomy: Clitoris Size, Hood Style, Hood Size, Hood Coverage, Minora Size, and Minora Thickness.
Like the Movable Window, each slider has an input box, on its left, to go beyond its limits.
11. Makeup
The Makeup category controls all cosmetic layers applied to the character’s face and nails. It combines layered makeup textures, color variants, opacity and gloss controls, and nail polish customization, allowing both subtle and highly stylized looks.
The following screenshot shows the Makeup category interface and its main components.
Screenshot coming soon.
① Makeup Shapes (Movable Window)
The Movable Window contains all 3D-related makeup parameters.
It includes six sliders that affect the shape and placement of makeup elements. Like all sliders in the Movable Window, their values can be pushed beyond their limits using the Custom Value Drawers.
② Main Tabs (Side Window)
The Side Window contains five main tabs, each representing a distinct makeup layer: Full Face (makeup covering the entire face), Eyeshadow, Eyeliner, Blush, and Lipstick.
Each tab operates independently and can be combined freely with the others to build complex makeup compositions.
③ Visual Menu
The Visual Menu displays the available makeup textures for the currently selected tab.
A search bar allows filtering options using tags such as makeup styles (for example: y2k, douyin, pastel, gothic, bold), making it easy to browse large collections.
Each makeup option may include multiple color variants, displayed as small color squares at the top of the selection button. Selecting a variant applies the corresponding texture coloration.
④ Nail Color Section
This section controls nail polish customization.
Separate colors can be defined for Hand Nails and Feet Nails.
Each uses the full color picker system, including RGB sliders and opacity control. The opacity slider allows the nail polish to be partially transparent or fully opaque, enabling either subtle tinting of the nail texture or complete color coverage. By default, nail polish opacity is set to zero.
⑤ Makeup Sliders
This section contains sliders used to control opacity and glossiness for each makeup layer.
Each makeup category has its own Opacity and Glossiness controls, allowing fine-tuning of how strongly the makeup appears and how reflective it is. By default, all makeup layers start with full opacity, except Full Face, and all glossiness values are set to zero.
By combining these sliders across layers, a wide range of makeup styles can be achieved, from natural looks to highly stylized and heavy ones.
12. Haircut
The Haircut category controls all aspects of the character’s hair, combining 3D hairstyles, 2D scalp textures, advanced shader-based trimming, and a highly flexible color and shape system, offering full creative freedom across all available hairstyles.
Four layers of customization work together: the geometry of the strands, their trimming, the placement of the hairstyle, and its colors. They can all be combined freely, making it possible to turn any hairstyle into something completely different.
The following screenshot shows the Haircut category interface and its main components.
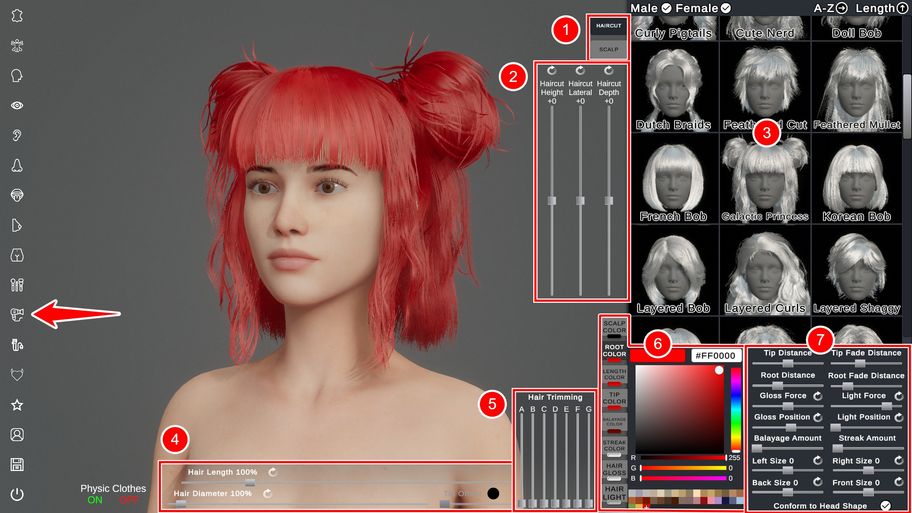
① Main Tabs (Side Window)
The Side Window contains two main tabs:
Haircut controls the 3D hairstyle, including its mesh, strands, shape, and overall structure.
Scalp controls the 2D scalp texture rendered beneath the 3D hair, allowing visual continuity in areas where the hair is sparse or trimmed.
These two tabs work together to ensure both visual realism and stylistic consistency.
② Haircut Position Sliders
This section allows you to adjust the global position of the selected hairstyle in 3D space.
The three vertical sliders, Haircut Height, Haircut Lateral, and Haircut Depth, move the whole hairstyle along the vertical, lateral, and depth axes, making it possible to fine-tune how the hairstyle sits on the head when needed.
These adjustments affect only the position of the hairstyle and do not alter its shape or proportions.
③ Visual Menu
The Visual Menu displays all available hairstyles.
The Male and Female toggles allow you to filter hairstyles by style category, and can be enabled together. Hairstyles are divided into two distinct groups, and no hairstyle belongs to both categories. These toggles are intended as a browsing aid only, as all hairstyles are fully compatible with all characters, regardless of body type or gender.
At the top of the menu, a Mods toggle enables or disables the display of modded hairstyles.
A search bar allows filtering by name or tag.
Sorting controls make it possible to organize hairstyles alphabetically (A-Z / Z-A) or by Length, from shortest to longest or the reverse, providing an efficient way to browse large hairstyle libraries.
④ Global Hair Controls (Geometry)
The controls at the bottom of the screen work directly on the geometry of the hairstyle, which is rebuilt in real time.
Hair Length stretches or shortens every strand of the hairstyle uniformly, from 25% to 400% of its original length.
Hair Diameter makes every strand thinner or thicker, from 10% to 2500% of its original thickness.
Tip Offset is an optional control that must be enabled via its toggle. When active, it overrides the hair tip thickness by fading it to zero. The slider defines where along the strand this fade occurs, allowing precise control over how and where the hair visually ends.
⑤ Hair Trimming (Shader-Based)
Unlike Hair Length, which changes the geometry of the whole hairstyle, Hair Trimming operates at the shader level: it hides parts of the strands instead of changing them. Depending on the hairstyle, between one and seven strand groups may be available, labeled from A to G, each with its own trimming slider.
Each slider independently trims a group of strands and can be combined freely with all other hair controls. This system allows for drastic modifications such as shaving parts of the head, removing specific sections of a hairstyle, shortening bangs, or reshaping the cut far beyond its original design.
⑥ Color Section
The Haircut category includes an advanced color system paired with the sliders in the next section. Up to eight distinct color layers can be controlled, each with its own tab:
- Scalp Color tints the 2D scalp texture beneath the hair.
- Root Color, Length Color, and Tip Color create a gradient along the strands.
- Balayage Color and Streak Color add painted highlights or colored strands on top of the gradient.
- Hair Gloss and Hair Light set the color of the reflections on the hair.
All colors support RGB sliders and hexadecimal input, enabling highly precise and experimental color combinations.
⑦ Sliders (Side Window)
The first ten sliders fine-tune how the color layers are applied:
- Root Distance, Tip Distance, Root Fade Distance, and Tip Fade Distance decide where each gradient color starts and how smoothly the colors blend.
- Balayage Amount and Streak Amount control how much of each highlight layer is visible.
- Gloss Force, Light Force, Gloss Position, and Light Position control the intensity and placement of the reflections.
Together, these controls make it possible to create natural ombrés, complex gradients, metallic looks, unconventional color combinations, and highly stylized effects.
Following these, four shape sliders (Left Size, Right Size, Back Size, and Front Size) modify the 3D form of the hairstyle itself. Unlike the position sliders in section ②, these controls deform the hairstyle’s shape, allowing further refinement of volume and silhouette.
Finally, the Conform to Head Shape toggle determines whether the hairstyle should deform to follow the character’s head shape. Some hairstyles may not behave optimally with certain head morphologies, and this option allows users to decide whether the hair should adapt to the skull or retain its original structure.
13. Pilosity
The Pilosity category controls all the hair of the face and body apart from the haircut: eyebrows, eyelashes, and body hair.
The following screenshot shows the Pilosity category interface and its main components.

① Eyelashes Shapes (Movable Window)
Eyelashes are the only 3D element of this category: all other types of hair are 2D textures. The Movable Window therefore contains five sliders shaping the eyelashes: Length Top, Length Bottom, Angle Top, Angle Bottom, and Outer Shape.
As with all Movable Windows, slider values can be pushed beyond their limits using the Custom Value Drawers (opened with the white arrows).
② Main Tabs (Side Window)
Eight tabs select the type of hair displayed in the Visual Menu: Eyebrows, Eyelashes, Arms Hair, Armpits Hair, Body Hair, Pubic Hair, Legs Hair, and Feet Hair.
③ Visual Menu
The Visual Menu displays the styles available for the active tab. For eyelashes, for example, it offers several families of styles, such as Bushy, Extra, False, Natural, and Small, while None removes them.
At the top of the menu, a Mods toggle enables or disables modded content, and a sorting control organizes the styles alphabetically.
④ Color Section
Four color tabs are available: Eyebrows, Eyelashes, Body Hair, and Pubic Hair. The Body Hair color applies at once to the hair of the arms, armpits, body, legs, and feet.
Each uses the full color picker, see the Color System chapter.
⑤ Sliders (Side Window)
A. Eyebrows Thickness and Pubic Hair Thickness set the thickness of the hair in three steps.
B. Eyebrows Bump, Eyebrows Opacity, Eyebrows Gloss, and Eyebrows Specular control the relief, the visibility, and the shine of the eyebrows.
C. Eyebrows Height, Eyebrows Gap, and Eyebrows Rotation adjust the placement of the eyebrows on the face.
14. Tattoos
This section is coming soon.
15. Randomizer
The Randomizer is a draggable window that can be opened and closed at any time from the Sidebar Menu, whatever the active category. It generates random variations of your character, zone by zone.

Each slider sets the maximum amount of randomization applied to one zone of the face: Head Amount, Ears Amount, Eyes Amount, Nose Amount, and Mouth Amount.
When you click Randomize, every value of each zone is randomly shifted from its current value, up to the chosen percentage. A zone set to 0% is left untouched, which makes it easy to randomize only the nose, for example, while keeping the rest of the face.
Because the randomization starts from your current values, the Randomizer can be used both to explore completely new faces and to add subtle variations to a character you already like.
16. Reference
The Reference window is a draggable window that can be opened and closed at any time from the Sidebar Menu. It displays an image of your choice on screen, so you can recreate a look from a reference without leaving the game.

Click Import a picture to load an image from your computer, then adjust it with three sliders:
- Opacity makes the picture more or less transparent.
- Scale resizes the picture.
- Rotation rotates the picture.
17. Save / Load
The Save / Load category is where your character becomes a card: you set up how the card looks, fill in the character's identity, and save or load your characters.
The following screenshot shows the Save / Load category interface and its main components.

① Card Render Settings
The panel on the left sets up the pose and expression of the character for the card's render:
- Head Focus sets how much the head follows the camera: at 0%, the head follows its animation; at 100%, it looks at the camera; in between, it blends both.
- Natural Eyes enables the natural eye animation, also available in the Eyes category. When it is disabled, the Eyes Focus slider works like Head Focus, but for the eyes.
- Close Right Eye and Close Left Eye close each eye, to create a wink for example.
- Open Mouth opens the mouth, and Pupil Dilation sets the size of the pupils.
- Pose and Mood offer lists of body poses and facial expressions.
None of these settings are saved with the character: they are used for the card's render, and also for visualization, since they stay active when you go back to the customization categories.
② Card Background
Below the card preview, two sliders set the card's background:
- The first slider selects the background image. Its first position has no image at all, leaving a plain background whose color is set with the color picker at the bottom left.
- The second slider moves the background from left to right, since background images are cropped into a square.
You can add your own backgrounds by placing images in this folder:
AppData\LocalLow\Lucid Lust\Lucid Lust\backgrounds

③ Identity & Personality
The drawer opened with the white arrow next to the card contains the character's identity: Name, Surname, Sexual Orientation, Relationship Status, Nationality, Place of Residence, Age, and Zodiac Sign.
Characters are always adults: a card can never be saved with an age below 18.
The Bio, Likes, and Dislikes fields tell the character's story and personality. They are displayed in the description of the card when it is shared on lucidlust.net, and Lucid Chat also uses them to create a personality you can talk with.
Finally, Tags make it easy to sort and search your characters.
④ Voice
The Voice list selects the voice of the character, with several voices for each type of character, and the play button next to it lets you listen to it directly. Voice Pitch makes the voice higher or lower.
⑤ Saving & Loading
The right side of the screen lists your saved characters, with a search bar to filter them by tag and a Refresh button to update the list. Click a card to load it: a confirmation window reminds you that any unsaved changes to the current character will be lost. A toggle in this window hides it for the rest of the session, so you can load characters quickly.
To save your character, give it a name in Set Save Name, then click Save Girl to Disk: the character is saved as a PNG card, which contains all its data.
If a card with the same name already exists, a message asks you to click a second time to confirm. The old card is then automatically moved to an old folder, so nothing is ever deleted. Open Save Folder opens the folder where the cards are stored.
Cards can be shared on lucidlust.net, and a card downloaded from the site can be loaded by placing it in the save folder, then clicking Refresh.
Load from Code imports characters created with very old versions of the game, which used text codes instead of cards.
18. Color System
Every color of the Character Creator, from the skin to the card background, uses the same color picker.
The following screenshot shows the color picker and its main components.

① Color Preview and Hex Code
The rectangle at the top left shows the current color, and the field next to it displays its hexadecimal code, such as #FF0000 for pure red.
To reuse a color on another element, simply copy its hex code and paste it into the other color picker.
② Color Square and Hue Bar
The vertical bar selects the hue, and the square sets its saturation and brightness.
③ RGB Sliders
The R, G, and B sliders set the red, green, and blue values of the color, from 0 to 255. Some color pickers also have an O slider, which sets the opacity of the color.
④ Color Palette
The palette at the bottom offers a selection of ready-to-use colors. Clicking the + button adds the current color to the palette, making it easy to reuse.
Each color picker has its own palette, which is reset at the start of each session.
19. Piercing System
The Piercing System is shared by every category that supports piercings: Head, Ears, Nose, Mouth, Breasts, and Bottom.
Each category offers its own set of piercing slots, and each slot can hold its own piercing, configured independently from all the others.
The following screenshot shows the Piercing System and its main components.

① Choosing a Slot
A piercing slot can be selected in two ways: with the Piercing Location Tabs of the Side Window, or by clicking one of the white dots of the Piercing Visual Selection.
Once a slot is selected, a small blue orb, the Piercing Goal, appears on the character. It marks the exact point where the piercing is attached to the skin, and follows every deformation of the skin in real time. When you want to shape the character without seeing it, the Hide Piercing Goal button hides the orb.
② Piercing Models
The top of the menu displays all available piercing models, such as straight and curved barbells of various lengths and ball sizes. Selecting None removes the piercing from the active slot.
③ Materials
Below the models, a horizontal row of material spheres sets the look of the piercing, from gold, silver, and chrome to glossy colors and patterned finishes.
④ Transform Controls
The last section adjusts the piercing in 3D space, with three groups of sliders, one per axis (X in red, Y in green, and Z in blue):
- Position moves the piercing relative to its attachment point.
- Rotation rotates the piercing around its attachment point.
- Scale resizes the piercing, 100 being its default size.
Each slider also has an input box, allowing precise values to be entered directly.